Blackstone
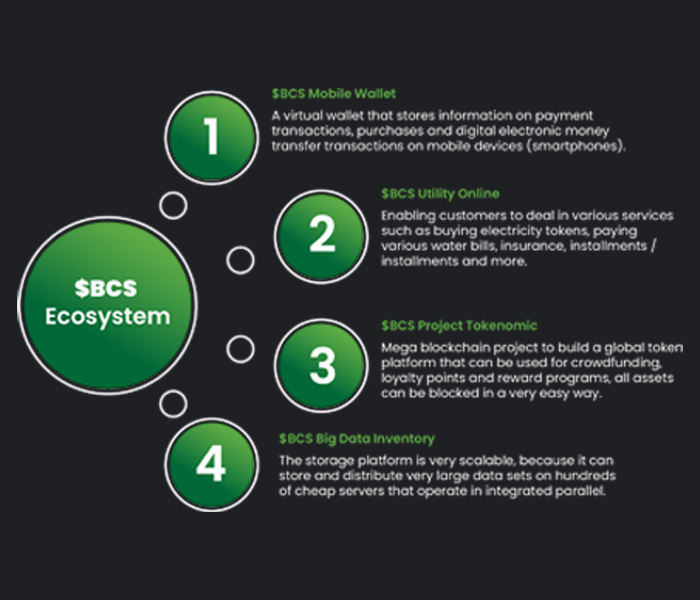
BCS is a decentralized blockchain platform that focuses on the operation of the blockchain platform.
National currency transfers are maintained on the blockchain platform via the operator Smart-Gateway.
The BCS is an open-source, community-driven, community-driven decentralized currency that allows people to
save and invest their wealth in a currency controlled by a non-government, and even get great interest in investment.
This means that anyone who holds a BCS Token in their wallet will receive interest on their balance in return for
helping maintain network security.
At present, only about one third of World's population has bank accounts. Among these people, peer to peer money transfers require high costs when between rival banks. Not to mention, two-thirds of other World's cannot do peer to peer money transfers at all because their wealth is trapped in cash
BCS Solutions
We solve this problem by allowing World's to change their money or money in bank accounts into digital assets. By holding their USD in the form of a digital asset called the BCS Token, which was built on Ethereum Blockchain, People can transfer their money anywhere in the world, at any time, at zero cost.
Security
The BCS is built on Ethereum Blockchain and, therefore, increases world-renowned security and transparency
Trusted
BCS reserves that support USDT are audited every month by our Financial partners to ensure that your money is stored safely.
Realiable
BCS can be exchanged back to USDT at any time, either by transacting it back into the account or redeeming it as cash at a trusted merchant.
Fast
Transactions to anywhere in the world occur in minutes because they utilize the speed of Ethereum Blockchain.
Stable
BCS are supported by BCS stored in reserves, BCS is always the same as USD making it a stable store of value.
Accessible
The BCS token will allow blockchain fans to access the Decentralized Application on Ethereum Blockchain.
The BCS ecosystem is designed to bridge the gap between traditional online trading and Cryptocurrency investment.
2017-2023 Strategic Plan: Value and Resilience The number of cryptocurrency holders is projected to increase nearly 10-fold, from the current 22 million to 200 million worldwide in 2020. The simplest way to become a cryptocurrency owner is to sell goods for crypto. This approach will encourage adoption in the coming years. Cryptocurrency market capitalization is around $ 300 billion. reaching 37% of the world population in 2020.
What is the Blockchain?
Most of the world of cryptocurrency technology such as Bitcoin relies on the form of databases with the advantage of being able to track large and safe transaction volumes. The technology used by many digital currencies is Blockchain. Blockchain was First implemented in 2009, and was revolutionized with Blockchain 2.0 in 2014. The Blockchain technology consists of blocks that hold transactions, where each block is interconnected through cryptography, thus forming a network. Blockchain also has the potential to be used outside the scope of digital currencies, and attracts many traditional Financial institutions to be adopted.

Blockchain Works
The Blockchain system consists of two types of records, transactions and blocks. This transaction is stored together in one block. The unique thing about the Blockchain is that each block contains cryptographic hashes that form a network. Cryptographic hash function is to take data from the previous block and convert it to compact string. This string allows the system to easily detect sabotage. With this method, it means that each block does not need to have a serial number, the hash allows each block to verify its integrity. Each block will confirm its validity from the previous block. Block connection is not the only thing that keeps the network safe. This technology is also decentralized, every computer with installed software has a copy of Blockchain that is constantly updated with new blocks. There is no centralized server that holds the transaction, and because each new block must meet the requirements in the chain or network, no one can overwrite the previous transaction.
Blockchain Structure
Types
LEB128 Little Endian Base 128 encoding for unsigned integers typically used to specify length prefixes for arrays and strings. Values in range [0, 127] are encoded in one byte. Larger values use two or more bytes.
Integer
A LEB128 integer with a maximum allowed value of 0x7fffffffffffffff (2 – 1) and a minimum of 0. A varint63 its into a signed 64-bit integer.
String
A binary string with a LEB128 prefix specifying its length in bytes. The maximum allowed length of the underlying string is 0x7fffffff (2 – 1). The empty string is encoded as a single byte 0x00, a one-byte string is encoded with two bytes 0x01 0xNN, a two-byte string is 0x02 0xNN 0xMM, etc
String32
A fixed-length 32-byte string typically used to encode hashes.
SHA3
SHA3 refers to the SHA3-256 function as defined in FIPS202 with a fixed-length 32-byte output. This hash function is used throughout all data structures and algorithms in this spec, with the exception of SHA-512 (see FIPS180) used internally as function H inside Ed25519 (see RFC8032).
List
A List is encoded as a Integer-prefixed list of serialized items, one by one, as defined by the schema. The length prefix indicates the number of items that follow.
Pointer
A Pointer is encoded as a String32, and identifies another entry by its ID. Pointer restricts the possible acceptable types: Pointer
Program
Program encapsulates the version of the FGT and the bytecode that should be executed by that BCS
 Program encapsulates the version of the BCS and the bytecode that should be executed by that BCS
Inputs:
program,
arguments (list of strings),
transaction version (integer).
Program encapsulates the version of the BCS and the bytecode that should be executed by that BCS
Inputs:
program,
arguments (list of strings),
transaction version (integer).
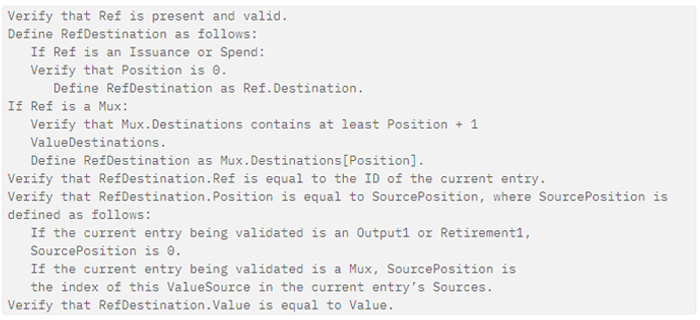
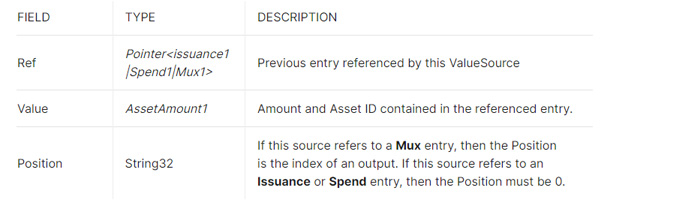 Value Source 1 Validation
Value Destination 1
An Entry uses a ValueDestination to refer to other entries that receive value from the current Entry.

Merkle Root
A top hash of a merkle tree (binary or patricia). Merkle roots are used within blocks to commit to a set of transactions and complete state of the blockchain. They are also used in merkleized programs and may also be used for structured reference data commitments.
Merkle Binary Tree
The protocol uses a binary merkle hash tree for efficient proofs of validity. The construction is from RFC 6962 Section 2.1, but using SHA3–256 instead of SHA2–256. It is reproduced here, edited to update the hashing algorithm. The input to the merkle binary tree hash (MBTH) is a list of data entries; these entries will be hashed to form the leaves of the merkle hash tree. The output is a single 32-byte hash value. Given an ordered list of n inputs, D[n] = {d(0), d(1), ..., d(n-1)}, the MBTH is thus defined as follows: The hash of an empty list is the hash of an empty string: MBTH({}) = SHA3-256("") The hash of a list with one entry (also known as a leaf hash) is: MBTH({d(0)}) = SHA3-256(0x00 || d(0)) For n > 1, let k be the largest power of two smaller than n (i.e., k < n ≤ 2k). The merkle binary tree hash of an n-element list D[n] is then defined recursively as MBTH(D[n]) = SHA3-256(0x01 || MBTH(D[0:k]) || MBTH(D[k:n])) where || is concatenation and D[k1:k2] denotes the list {d(k1), d(k1+1),..., d(k2-1)} of length (k2 - k1). (Note that the hash calculations for leaves and nodes differ. This domain separation is required to give second preimage resistance.) Note that we do not require the length of the input list to be a power of two. The resulting merkle binary tree may thus not be balanced; however, its shape is uniquely determined by the number of leaves Merkle Patricia Tree The protocol uses a binary radix tree with variable-length branches to implement a merkle patricia tree. This tree structure is used for efficient concurrent updates of the assets merkle root and compact recency proofs for unspent outputs. The input to the merkle patricia tree hash (MPTH) is a list of key-value pairs of binary strings of arbitrary length ordered lexicographically by keys. Keys are unique bitstrings of a fixed length (length specified for each instance of the tree). Values are bitstrings of arbitrary length and are not required to be unique. Given a list of sorted key-value pairs, the MPTH is thus defined as follows: The hash of an empty list is a 32-byte all-zero string: MPTH({}) = 0x0000000000000000000000000000000000000000000000000000000000000000
BCS Digital Wallet is an application or program that allows you to send and receive
Send Money
Ease to send your digital assetsat the lowest cost, fast and secure in realtime
Safe & Reliable
BCS Digital Wallet is built with world-class security technology with a network system that is monitored 24 hours
Receive Money
Receiving money transacting for business, the BCS allows receiving digital assets with a wallet address.
How it works BCS Digital Wallet
BCS Digital Wallet is an application or program that allows you to send and receive digital Blackstone (BCS) assets, Blackstone (BCS). The wallet also tracks your BCS or BTC balance which is stored in one or more BCS Token addresses. In general, the wallet also has a feature that stores your transaction history. At present, only about one-third of the World have bank accounts. Among these people, peer-to-peer money transfers require high costs when between rival banks. Not to mention, two-thirds of Japanese cannot transfer peer-to-peer money at all because their wealth is trapped in cash. We solve this problem by enabling to convert their cash or money in bank accounts into digital assets. By holding their USDT in the form of digital assets called BCS 4, which are built on (ERC20) Ethereum Blockchain, can transfer their money anywhere in the world, at any time, at zero cost.
Research & Development
R & D Team Groups, We will continue to improve and build innovative designs to further strengthen our presence in this industry. Employing unlimited limitations of the 'Internet of Things' on new discoveries that will increase BCS Tokens to new levels of innovation.

Hundreds of companies in the field of financial technology (fintech) are trying to fill a large market niche in World. One of them is BCS Digital Wallet, start-up fintech is present with the aim of increasing financial inclusion in the country, through payment services and non-cash and non-card transactions. BCS Digital Wallet provides an open platform infrastructure for payments, which allows all users, both from the merchant and consumer side to conduct non-cash and non-cash transactions easily, safely and efficiently. The concept of the Digital Wallet BCS open platform can be integrated with the merchant platform and other payment channels. As a digital wallet, the Digital Wallet BCS can be utilized by various sectors, including education, public services, social services, to street vendors to support each transaction easily and safely.
BCS Token Fintech
For Online services, because it is integrated on the merchant platform, users can process payments using the Digital BCS Wallet easily and safely without having to leave the merchant platform. Digital Wallet BCS account users will also be automatically synchronized directly at various BCS merchants. One wallet, for all needs at various merchants. BCS also has a Data Center (DC) and Data Recovery Center (DRC) in Asia, which is one of the most sophisticated and capable DC and DRC in handling high transaction scalability. With high technology, BCS is able to carry out sophisticated risk management to protect users. To provide an initial experience to the community, currently BCS Digital Wallet has offered several services to support various electronic transactions, such as e-commerce transactions, credit top-ups, payment of electricity bills, and other transactions in several applications.
Based on sales factors and our target audience, we will market the BCS ecosystem investors and traders in online trading and crypto investment. We will utilize all marketing channels, both organic and paid. Our community managers will expand our organic reach within the crypto community, starting with existing Crypto Exchange traders who have trusted our company and experienced our superior and extensive services. We will inform the community about our work through Telegram, Medium, Bitcointalk, Facebook, Twitter and Reddit to get started. We will use this platform to communicate with traders and investors who allow our client services to help interested parties understand our ecosystem and its products.
Affiliate ProgramThis program is designed to invite anyone from all over the world to register at no cost and make a profit for every investment made from their references. Affiliate programs help in spreading the word about brands through thousands people, each of which will promote the brand to thousands more people is rapidly developing. This program will support affiliation with promotional and marketing materials as well customer support. All affiliates will have accurate reference tracking.
This team covers all areas of digital and direct marketing that allow us to control everything in-house ensuring brand quality, clarity, and accuracy of the messages we send are managed carefully and inspire community management. Our marketing team consists of several well-organized segments. Segments are divided by focused tasks but put together in one large open plan department as a team.
Digital Marketing
Online digital marketing allows us to have global reach and targets the right audience. This requires creative, technical and analytical skills wrapped in marketing artificial intelligence such as Google, Facebook, purchasing media, anal y tics, SEO, online marketing campaigns, and BI experts.
Creative Development
Our creative team is responsible for every audio-visual aspect of the BCS Token. Creative developments have grown rapidly in recent years and marketing has produced video and visuals. To follow today's marketing demands, the creative team must be artistic, corporate, and very technical. Fortunately, we have gathered a group of young and creative individuals who are also aware of the needs and branding of the company. Graphic design, video production, video editing, graphic movement, art direction, and content writing collaborate to bring the BCS brand (Blackstone).
Helping Investors
Strong marketing not only works in the best interests of the company but also in the best interests of investors. When the BCS has a strong marketing team, each BCS Token holder will always be supported by the same team that works hard to maintain and increase the success of the Ecosystem BCS. And it works in the best interest of everyone who is part of this cryptocurrency community
AI Arbitrage Trade System
The Origins.
Although the development of the underlying technology dates back to the 1980s, cryptocurrencies as we know them are a quite new and rapidly evolving phenomenon.
Bitcoin was the first digital currency to be developed in 2008 by the pseudonymous developer(s) Satoshi Nakamoto and was released in early 2009.
In its early days only a few cryptography experts and privacy advocates known as the Cypherpunks recognized the revolutionary potential but Bitcoin
remained mainly undiscovered by the masses until mainstream media began to cover. In late 2011 Litecoin was one of the first alternative digital currencies to be
developed based on the Bitcoin protocol and gave birth to rise of the Altcoins.

Although there are thousands of cryptocurrencies today Bitcoin always maintained its dominance over all the Altcoins.
Illustration 1: Percentage of Total Market Capitalization (Dominance) Source: coinmarketcap.com
Current Metrics
Cryptocurrencies 3,769
Fiat currencies 156
Exchanges 166
Markets 12,438
(Source: coinlib.io)
Performance
The first real-world transaction with Bitcoin was arranged in May 2010 when two pizzas worth $25 were bought for 10,000 BTC, valuing one Bitcoin at less than one cent ($0.01). Just about one year later Bitcoin had already achieved parity with the US Dollar ($1) and kept rapidly shooting higher over the next years until it peaked at around $1,250 at he end of 2013. The collapse of Mt. Gox which was by far the biggest exchange at that time, handling almost 70% of the total trading volume, dealt a severe blow to the confidence of Bitcoin investors and BTC prices had to go through a long lasting consolidation phase until the all-time high was broken in early 2017 but once the ATH was broken Bitcoin skyrocketed. 2017 was a monumental breakthrough year for Bitcoin as we experienced prices shooting from under $1,000 at the beginning of the year up to almost $20,000. Even this astonishing performance was excelled by some Altcoins like ETH which posted record gains of almost 5,500% in 2017. These kinds of almost ridiculous performances can’t be achieved in any other market
Projections
The highly volatile nature of the nascent cryptocurrency markets makes it exceptionally hard to predict their future growth, but to give you an idea of what to expect in the coming years, we will present a brief overview of projections by some of the most notable key players in these markets. First and foremost, there is the widely publicized “1 Million USD by the end of 2020” prediction by the famous billionaire investor John McAfee. He emphasized that this seemingly excessive target would be achievable because the US Dollar will be massively devalued over the next years. McAfee might be considered a quite controversial figure but his track record of incredibly successful investments is unquestionable and he is not the only one with such exaggerated price targets. The renowned hedge fund manager, serial entrepreneur and venture capitalist James Altucher also has a Bitcoin price target of 1 Million USD by 2020 and though he was elected the most influential business journalist of 2017, he is certainly not just juggling numbers. The prominent venture capitalist Tim Draper just recently stated his Bitcoin prediction of 250,000 USD by 2022, which seems to be a much more realistic timeline and target but even that would suggest a staggering 3,000% gain from the current price levels. But not just Wall Street legends seem to believe in a bright future for this market, even the democratic US Senator Mark Warner labelled cryptocurrencies as transformational tech that would change the world and predicted a market capitalization “north of 20 trillion Dollars” by 2020
Regulation
In the early years after the inception of cryptocurrencies there were absolutely no regulations at all, it was basically the wild west. Due to their decentralized and often anonymous nature, legislators all over the world are still facing the complicated challenge of regulating a space, that was designed to be beyond the reach of centralized government authorities. Nevertheless, these regulatory efforts have been intensified in recent times. Regulation is necessary and helpful; clamping down on all sorts of shady criminal activities will help the ecosystem mature and encourage new investments. Especially big institutional investors will be prompted to finally enter the cryptocurrency markets when the regulatory landscape is shaping up
A World of Cryptocurrencies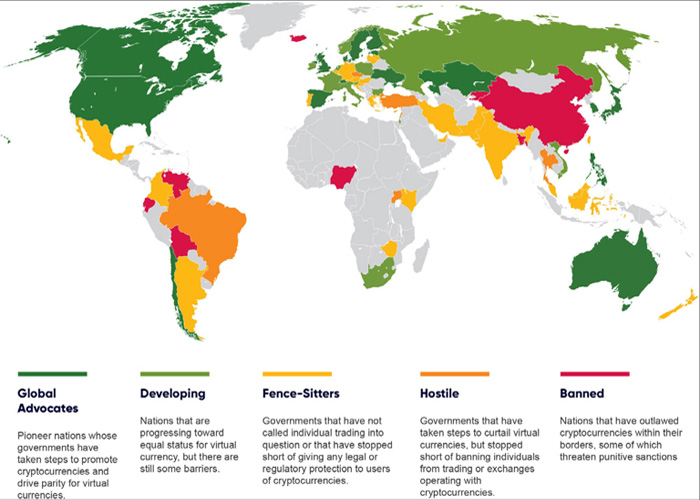
Illustration 2: World of Cryptocurrencies; Source:https://blogs.thomsonreuters.com/answerson/wp-content/uploads/sites/3/2017/10/World-of Cryptocurrencies-graphic.pdf (January 2018)
Liquidity
Liquidity measures the ability of an asset to be frictionless converted without affecting the assets price, ideally allowing buying and selling of an asset with minimal price disturbance. Liquidity is highly correlated to volatility - lower liquidity usually results in more volatile markets, causing drastic price swings,
whereas high liquidity creates a less volatile market, in which prices do not fluctuate as excessively. Despite the fact that the cryptocurrency markets are trading with extremely high-volume levels, they are not nearly as liquid as we might think.
This market is still highly fragmented in a web of exchanges under very different jurisdictions. The Liquidity is spread through various more or less trustworthy exchanges all over the world.
The emergence of more trustworthy regulated exchanges has boosted overall liquidity but has not yet delivered the desired effect of lowering spreads and slippage costs. Furthermore, increasing liquidity would definitely encourage significant institutional investments and promote mainstream adoption
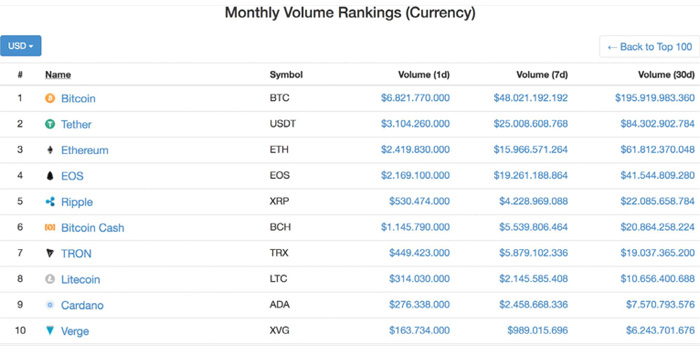
Illustration 5: Monthly Volume Ranking (Currency) May 2018; Source: coinmarketcap.com
Volatility
Volatility is the degree of variation in an assets price movements, most commonly measured by the standard deviation. Volatility relates to the uncertainty on the extent of price changes.
High Volatility means prices might change dramatically within a short time period, whereas low volatility means that prices do not fluctuate severely but change at a steady pace.
The nascent cryptocurrency markets are still highly volatile. Bitcoins Volatility Index currently stands at a 30-day average of 5.01% and most Altcoins experience even more excessive price swings.
In sharp contrast, the traditional markets just had their least volatile year in decades of trading. Bear and bull market cycles that last months or years in these markets are concluded in matters of weeks,
days or even just hours in the cryptocurrency markets, creating huge trading opportunities every single day. But as the graphic below indicates, this drastic volatility is expected to fade as these markets mature over time

Illustration 6: Bitcoin historical price (grey), daily volume (circles) and USDEUR volatility (blue) included for reference;
Source: Woobull.com
Spread
The spread usually refers to the gap between the bid and ask price of an asset, but the term is also used for the difference in prices on various exchanges, the arbitrage spread.
Low liquidity often results in huge spreads unveiling outstanding arbitrage opportunities.
While high frequency traders in the traditional markets battle over every per mille, high single-digit and even low double-digit spreads are emerging on a
daily basis in the cryptocurrency markets, making it the perfect playing field for arbitrage traders. Especially during the challenging trading environment in the recent market correction,
arbitrage trading will prove to be a rather safe and profitable alternative trading strategy. Below you can see the spreads of April 12th, 2018:
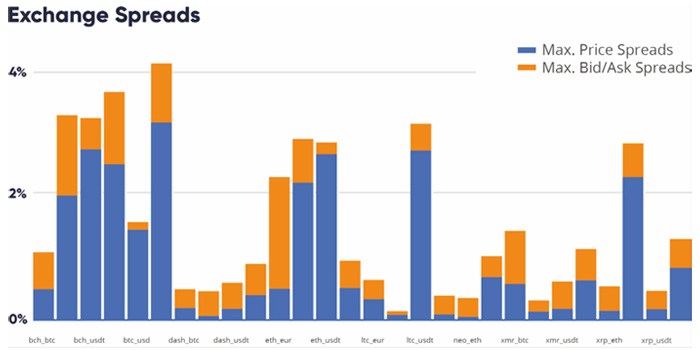
Illustration 7: Exchange Spreads April 2018;
Source: tokenspread.com
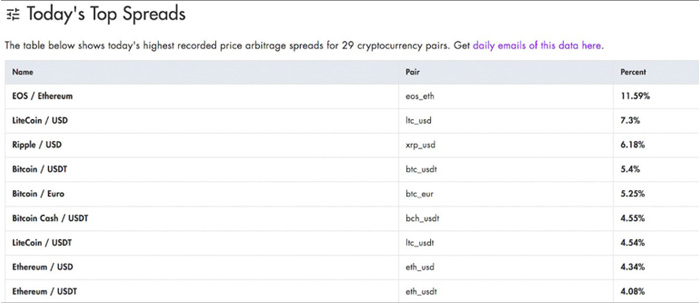
Illustration 8: Today’s Top Spreads April 2018;
Source: tokenspread.com
Along with the new disruptive technological opportunities, also new issues are also occurring and have to be taken into account. Because of the lack of liquidity for certain pairs, price manipulations and the high amount of non-professional traders,
the cryptomarket generally can be declared as extremely volatile. This leads to inefficiencies, where prices are highly varying between exchanges, especially when analyzing pair chains. Among various factors, this is one of the most important reasons
why institutional investors are still worried about entering the crypto area, which hinders the technology from evolving. In order to stabilize these inefficiencies and benefit from potential arbitrage possibilities a lot of technical solutions and
administrative workflows have to be implemented.
The complex web of exchanges, which includes different means of funding, KYC policies, API results and interfaces, increases the administrative and technical effort to set up an appropriate arbitrage system. Furthermore, users have to open accounts on
multiple exchanges in order to benefit from price spreads. For a fully automated arbitrage trading setup various factors have to be considered e.g. transaction time, transaction fees, authenticity of orders in their books, volume, withdrawal limits, etc.
This data is provided by exchanges and Blackstone Arbitrage obtains it through their custom Application Programming Interfaces (APIs). However, currently this data is not normalized and standardized. Therefore, working with market data streams from
different origins requires specific processing and reformatting of the data into standardized data structures, in order to be able to perform automated analysis of best pricings and liquidities per exchange, to spot truly profitable arbitrage possibilities.
Moreover, the problem of latency needs to be tackled, as time is a key factor when it comes to arbitrage trading. Fast internet connections as well as physical proximity are required, so that the necessary speed can be achieved.
Setting up the infrastructure for an individual is very costly, time consuming and needs a lot of expertise in financial markets as well as information technology systems. Furthermore, a lot of capital is needed to ensure the liquidity on relevant exchanges,
in order to be able to act as fast as possible. Therefore, Blackstone Arbitrage is offering its services to allow individuals of any kind to join pools for profitable arbitrage trading. At the same time, through aggregation of capital, Blackstone Arbitrage
will be able to invest in and improve the infrastructure, and keep sufficient funds on relevant exchanges at all times, so that the most profitable arbitrage trading opportunities can be realized
Arbitrage was defined by the French merchant Mathieu de la Porte. In his treatise “La science des négociants et teneurs de livres” it was used as a consideration of
different exchange rates to recognize the most profitable places of issuance and settlement for a bill of exchange.
From an academic point of view an arbitrage is a transaction that involves no negative cash flow at any probability.
Nowadays arbitrage is a trading strategy in economics and financial markets that enables traders and institutions to take advantage of price differences between different markets.
These differences occur due to inefficiencies of the markets, which lead to price spreads of currencies. Consequently, these spreads can be exploited for profit generation.
As the crypto market is still very young and immature, it offers plenty of possibilities to profit from price differences in a very short time. Based on our backlog tests,
the average profit which can be gained is around 0.85%, depending on the liquidity of the trader.
However, in order to achieve stable and positive results it requires following implementations:
• High liquidity on several exchanges (the more exchanges covered, the better)
• Specialized software with certain algorithms is needed to monitor the markets in order to spot the most profitable trades with a certain amount of money
• Specific global infrastructure is needed to perform the trades in the appropriate time (server locations, minimization of latency, etc.)
The market follows a certain trend: numbers of crypto-exchanges and -assets are growing faster than new funds flow into the market. Consequently, there is the same liquidity for a larger market,
which leads to an increase of arbitrage opportunities. Therefore, arbitrage offers an excellent way to profit in a volatile crypto-market with very low risk, while contributing to making the market itself less volatile by increasing its efficiency at the same time.
On April 11th, 2018 at 12:40 GMT, the price of 1 Bitcoin was $6,855.00 on Bitfinex and $6,962.97 on Exmo. That is a price spread of 1.57%. A trader who was holding Bitcoins and US Dollars on both of these exchanges at this time could have immediately realized
profits by selling his Bitcoins on Exmo and buying Bitcoins on Bitfinex
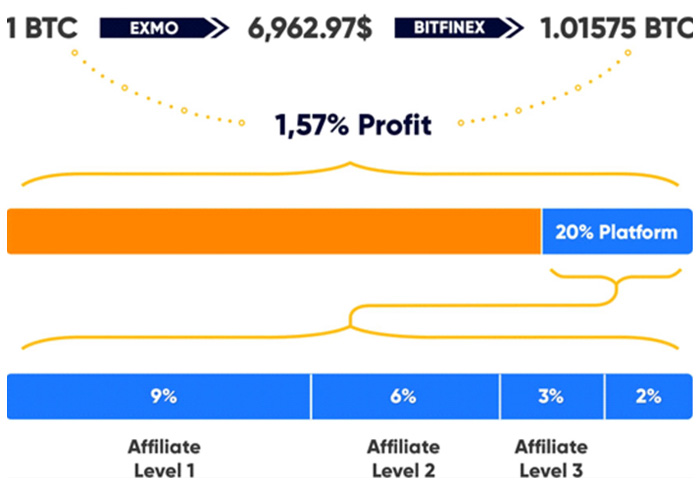 The profit will be distributed between the investor, the affiliate and the platform itself. As each party is contributing value to the Blackstone Arbitrage community the allocation of the profits is as followed: 80% to the Blackstone
-Coin Holder, up to 18% to the Affiliates and at least 2% to Blackstone Arbitrage. More information about the affiliate program is available on the website Blackstone Arbitrage.
The profit will be distributed between the investor, the affiliate and the platform itself. As each party is contributing value to the Blackstone Arbitrage community the allocation of the profits is as followed: 80% to the Blackstone
-Coin Holder, up to 18% to the Affiliates and at least 2% to Blackstone Arbitrage. More information about the affiliate program is available on the website Blackstone Arbitrage.
Blackstone Arbitrage Platform
Blackstone Arbitrage offers a platform for the Blackstone ecosystem where capital is aggregated in order to benefit from arbitrage trading between different exchanges together as a community. After intense analysis of the market, Blackstone Arbitrage defined different investment pools with specialized parameters for the most effective profit generation. Through the easy access to the platform, Blackstone enables automatic arbitrage trading in highly volatile markets for everyone. By merging liquidity and resources in our investment pools, Blackstone Arbitrage’s community members are enabled to take advantage of the algorithms we developed, the continuously improved infrastructure that Blackstone Arbitrage has set up and the combined liquidity that will be distributed on carefully selected exchanges. The dashboard is already developed and has a wallet integrated. The profits are denominated in US Dollar as the volatility of the currency is low and guarantees stable returns. Furthermore, profits can be withdrawn immediately or used for reinvestments. The withdrawal will be issued in Blackstone coins. The Blackstone Arbitrage Team is also working on the Blackstone exchange which will ensure the easy and safe transaction between Blackstone and BTC. However, we are also in contact with major exchanges to be listed there in order to increase the community even faster
Beta Phase: Arbitrage Pairs Trading
Before the first stage, Blackstone Arbitrage was analyzing major exchanges and their spreads of BTC pairs. Additionally, we focused and established an infrastructure to enable the arbitrage trading. After realizing the huge difference of spreads, Blackstone Arbitrage developed an automated arbitrage trading system, which is able to spot potential arbitrage opportunities of the 19 biggest exchanges, taking into consideration transaction time, transaction fees, volume, order books etc. This system is online since November 2017 and is already used for aggregated arbitrage trading. A closed group of trusted enthusiasts and traders was testing this prototype, until there were no major errors left
Stage 1: Arbitrage Pairs Trading
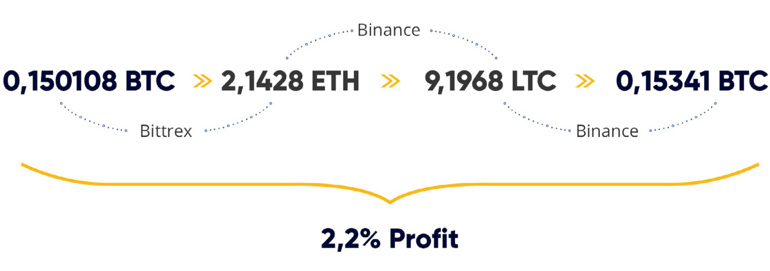
After realizing the challenges with low volumes on exchanges and unexpected costs through slippage, Blackstone Arbitrage found a solution that enables investors of any kind to participate in arbitrage trading: by pooling our resources and sharing arbitrage opportunities with each other, everyone makes more profit on average (no more “the winner takes it all”). There are many arbitrage opportunities, but not with high volume. Therefore, Blackstone Arbitrage is aggregating the investments and the algorithm is splitting it in appropriate sizes to benefit with lower volumes on more frequent trades. Effectively, this leads to higher profits. An example can be seen in Abstract 3. Arbitrage Trading. This system will go live for the community as soon as enough liquidity and the appropriate network infrastructure are in place. This can be ensured when the required starting capital of 20,000,000 USD has been raised in our ICO.
Stage 2: Simultaneous
Another arbitrage strategy Blackstone Arbitrage is using is the simultaneous Short-Long Strategy. Here we analyzed the spreads between exchanges and monitored on what exchanges the automated bots are having the
most effect on arbitrage. Through this analysis to align the existing algorithm to the Short-Long Strategy in order to be able to execute more arbitrage opportunities.
The following example illustrates how this strategy is executed :
 When the price spread between two exchanges is high enough (first vertical line), the algorithm is selling BTC at the higher price (blue line=Bitstamp) and buying BTC at the same time, with the same amount for a
lower price (red line=Bitfinex). Then the system waits until the price spread between those exchanges is minimal and simultaneously executes the same trades reversed (selling at Bitstamp and buying on Bitfinex).
So the risk-free arbitrage benefit is the difference between the first and the second spread. Furthermore, it is possible to use the same strategy with futures which is the additional feature. With futures it is
currently working for Bitmex and Bitfinex
When the price spread between two exchanges is high enough (first vertical line), the algorithm is selling BTC at the higher price (blue line=Bitstamp) and buying BTC at the same time, with the same amount for a
lower price (red line=Bitfinex). Then the system waits until the price spread between those exchanges is minimal and simultaneously executes the same trades reversed (selling at Bitstamp and buying on Bitfinex).
So the risk-free arbitrage benefit is the difference between the first and the second spread. Furthermore, it is possible to use the same strategy with futures which is the additional feature. With futures it is
currently working for Bitmex and Bitfinex
Stage 3: Arbitrage Chain Trading
As the market evolves more cryptocurrency projects and exchanges are established. This leads to an even higher inequality of the market prices on exchanges, which gives more arbitrage opportunities.
Because of the variety of coins and tokens, certain combinations of arbitrage chains are more profitable than just trading pairs. However, the calculation for feasible combinations is very complex,
as more variables have to be taken into account to find the most promising arbitrage cases. Therefore, the Blackstone Arbitrage Team is developing the Blackstone wallet with integrated cloud computing capability to
be able to calculate complex optimizations in an adequate time in the given solution room, which is determined by dynamic variables. The more computing power the ecosystem can provide, the more Coins/Tokens and exchanges
can be included in the calculations, which increases the multi-dimensional solution room. This leads to more trading possibilities and higher returns.
The example below shows a chain trading arbitrage opportunity:
Stage 4: Fully Decentralized
Stage 4 will complete the decentralization process, by allowing each user to set up their Blackstone wallet with API credentials for their accounts on exchanges. Additionally, to the automated Blackstone Arbitrage algorithms, this will enable the users to create their own algorithms and execute orders at their will, independent from Blackstone Arbitrage’s trading pools. At this point, the resilience of Blackstone Arbitrage’s network will be so high that it cannot be turned off anymore. An entire ecosystem revolving around arbitrage trading will eventually emerge, since there will be demand for data aggregators, optimized algorithms, fine-tuned trading strategies and more. Nodes with physical proximity to exchanges or an appropriately fast internet connection will also add a high value to the network, where the respective payload will be distributed as reward to the closest nodes of the system. As the Blackstone Arbitrage project progresses and reaches milestones, there will be more users, more liquid capital on exchanges for arbitrage trading, as well as more speed and resilience due to more nodes running in the network and a more and more decentralized network structure. This in turn will increase demand for Blackstone, because it is the key to access Blackstone Arbitrage’s trading platform. Even though the supply of Blackstone is not limited to a certain number, the newly available coins should not have a negative impact on the price, because demand is still surpassing supply.
Blockchain
The Blackstone blockchain is based on Blackstone code (a.k.a. Blackstone), and the entire project named Blackstone is public on GitHub https://github.com/blackstone. The decision to premise on the work of Blackstone’s developers was made because the blockchain they created is fast, secure and has low transaction costs. It was not necessary to “reinvent the wheel”, so to speak. There are a couple of differences between Blackstone and Blackstone -core. One of them is that staking is much more rewarding with Blackstone. The reason for this is that a lot of stakers means that the network has a higher grade of decentralization. High staking rewards are a strong incentive for staking, and will secure the network with many nodes. Other differences affect the scalability and speed of transactions. Optimizations were implemented so that transaction fees are reduced while confirmations occur faster.
Proof-of-Stake Consensus Mechanism
Blackstone consensus mechanism is Proof-of-Stake (PoS), an alternative to Bitcoin’s Proof- of-Work (PoW) consensus mechanism.
With PoW, miners solve hard mathematical problems that are easy to verify,
in order to make sure that the network cannot be spammed by malicious clients.
Miners create new blocks of transactions by validating the transactions and putting the work of solving the mathematical problem in,
hence the name. The first miner that finds a correct solution to the current block of transactions gets to collect the block reward,
which consists of the transaction fees paid by senders and newly available coins.
PoS on the other hand allows holders of coins to stake them, which means that they receive the transaction fees paid by senders for helping the network with validating transactions.
PoS blockchain clients do not have to prove that they put work in, because there is a different incentive that makes spamming the network or manipulating it unattractive:
if a client is identified as a malicious actor, he loses his staked coins.
This is by far more energy efficient than PoW systems. Users can even stake their coins on a Raspberry Pi using only 2W of power. As a result, this maximizes the profits that users make when staking.
The Blackstone blockchain pays 7% percent interest per annum to stakers. This is substantial enough to make a profit considering the hardware requirements are not as exaggerated as on PoW-based blockchains.
Here is a quick comparison of PoS and PoW. It should become clear why we decided to employ PoS instead of PoW:

Fully Decentralized
As a PoS-based blockchain, Blackstone promotes a decentralized blockchain. Cryptocurrency enthusiasts know that mining pools reduce the decentralized nature of a blockchain.
They place a single business or group of individuals in control of a lot of the network’s computing power (a.k.a. hashrate). This may increase the likelihood of
Sybil attacks and 51% attacks in PoW-based systems.
Since Blackstone relies on PoS, the economics of mining pools are not effective. Additionally, since the consensus is done arbitrarily without reliance on the computing power,
it does not make sense to pool resources together. As a result, Blackstone is more decentralized than PoW-systems like Bitcoin.
An indicator of the decentralization of a PoS blockchain is the proportion of market capitalization and number of staking nodes.
The table below shows the most decentralized blockchains based on this value. It can be clearly seen that the decentralization ranking of coins changes.
However, Blackstone is still leading this ranking.

Fastest Transaction Speeds in the Industry
One of the perquisites for staking is that the user needs to have a full node wallet such as the Blackstone wallet, which downloads the entire blockchain data, meaning the history of all transactions since the very beginning. The larger number of nodes allows for increased transaction speeds. A metric that can be used is the comparison of the market capitalization and the number of active nodes. Blackstone has a proportion of around 0.38, as compared to Ark with 0.53, ZCash with 0.55 and Ethereum with 4.18. This provides a metric of how decentralized the transactions are on the blockchain. Moreover, it indicates that Blackstone has the best incentive system leading to more active nodes per amount transacted on the blockchain. Blackstone aims to achieve even better results, by making staking more profitable and therefore more attractive to users. Blackstone has one of the fastest transaction speeds in the cryptocurrency industry, blocks are created every 30 seconds. As a result, all transactions are confirmed in seconds, unlike Bitcoin, where it sometimes takes minutes or even hours. Blackstone can currently handle 1,120 transactions per second.
Low Transaction Costs
As a PoS-based system, the transaction costs are substantially lower than in other blockchains. Initially, transactions on the blockchain cost around 0.0001 Blackstone. This is very affordable and extremely competitive. However, the returns are equally attractive to the stakers who get 7% per annum without the need for expensive mining equipment. Even a Raspberry Pi can run the staking Blackstone wallet.
Differences between Bitcoin and Blackstone
Even though the Blackstone - blockchain is based on Blackstone, some aspects are not supported. The main difference is the lack of a side chain.
This means that there is no “private send” feature. However, since Blackstone serves as a utility coin that grants access to Blackstone Arbitrage’s
trading platform rather than a means of payment, there is no need to make transactions untraceable. Therefore, the entire ledger is publicly available similar to Bitcoin.
The Blackstone blockchain will have the same features as NAV Coin version 4.1.1. This means that it will also inherit some of the features of Bitcoin 0.13 that
Blackstone was forked from. As a result, the functionality will be compatible with most of the exchanges and applications that support Blackstone.
Blackstone Arbitrage will be able to handle real-time transactions at fast speeds using the inherited protocols. The cost of the transactions will be low and
users who want to stake can simply acquire Raspberry Pi 3 kits for less than $100 and set up their own staking Blackstone wallets
Blackstone wallet
Blackstone Arbitrage released the first and only official Blackstone wallet on Github: https://github.com/blackstone/Arbitrage.
Each installed Blackstone wallet becomes a node in Blackstone’s network and communicates with other nodes in a decentralized, peer-to-peer (P2P) fashion.
The first version of the Blackstone wallet will support sending and receiving Blackstone, as well as staking them. For stage 2 no additional features are needed.
The next major release will introduce a new feature and mark the beginning of Blackstone Arbitrage’s stage 3: users can contribute computational power and internet
bandwidth to the network and therefore be rewarded with Blackstone. Finally, the Blackstone wallet will allow integrating with cryptocurrency exchanges directly
using your own API credentials in stage 4, which is going to make fully decentralized arbitrage possible to anybody for the first time in history.
Staking
In order to stake the new cryptocurrency, the user first needs to download the latest version of the Blackstone wallet. After the Blackstone wallet
is installed and started, an entire copy of the blockchain will be downloaded to that computer. Before the download finishes, your Blackstone wallet will be in
what can be considered an immature state. Maturity is reached in around one to two hours, depending on the actual size of the current blockchain and the speed of
your internet connection. Coins for staking can be sent to the Blackstone wallet while it is still in an immature state. After the blockchain- download has completed,
the Blackstone wallet is ready for staking. A user can go to the settings section and click on “Unlock Blackstone wallet for staking”.
The user will be prompted to complete the process by entering the Blackstone wallets passphrase. After around 60 seconds a message appears,
saying to expect earning rewards in a given period. The format is given as minutes, hours and days. It is important to note that the Blackstone wallet’s security
has not been lost at this point. You will still be required to provide your passphrase when sending coins to others. Also, leave your Blackstone wallet running and
online at all times to maximize profits. The interest is compounded and the longer you stake, the more you earn. You can stake using Raspberry Pi 3 machines that use less than 2W of power.
Staking Rewards
The staking rewards are higher at the beginning, which incentivizes a lot of people to stake. This in turn guarantees a strong decentralized network with fast transaction speeds.
In the first month, the staking rewards are 5%. Essentially, if you stake 10,000 coins, you will get 500 as reward after one month of leaving the Blackstone wallet online with staking enabled.
However, it is important to note that the rewards are based on the group of coins that won the lottery as opposed to the total number of coins staked.
The normal rewards are around 0.01 to 8 coins for every block staked. This is calculated using the following formula:
Staking Rewards = (number of coins in the group) * (number of days old / 365) * 0.07 Example: 1,000 coins are in a coin group that has been staked for five days. The reward will be 1,000 * (5 / 365) * 0.05 = 0.959 coins.
In the following months, the staking rewards will be decreased to moderate inflation.

Blockchain Blocks
Sometimes a block may be created but gets rejected by other nodes because consensus is not reached. These blocks are referred to as orphan blocks. It is a common occurrence that is caused by two Blockchain wallets staking the next block at almost the same time. The Blockchain wallet works by sending a message to other nodes informing them that you staked the next block. If the other nodes already received a similar message from a different Blockchain wallet earlier, the nodes will reply that it is too late. Your Blockchain wallet will mark the block as an orphan block. You can identify an orphan block on the transaction tab of the Blockchain wallet. They are normally light green as opposed to a darker green and they have a question mark icon beside them indicating that the other nodes did not confirm them on the blockchain. The average occurrence of orphan blocks is around 3%. This is attributed to the short block time.
Sometimes a block may be created but gets rejected by other nodes because consensus is not reached. These blocks are referred to as orphan blocks. It is a common occurrence that is caused by two Blackstone wallets staking the next block at almost the same time. The Blackstone wallet works by sending a message to other nodes informing them that you staked the next block. If the other nodes already received a similar message from a different Blackstone wallet earlier, the nodes will reply that it is too late. Your Blackstone wallet will mark the block as an orphan block. You can identify an orphan block on the transaction tab of the Blackstone wallet. They are normally light green as opposed to a darker green and they have a question mark icon beside them indicating that the other nodes did not confirm them on the blockchain. The average occurrence of orphan blocks is around 3%. This is attributed to the short block time.
APIs in General
APIs can be defined as sets of procedures or instructions that are used to create applications and algorithms that provide access to features of another application or operating system. In layman terms, APIs specify how different functions or algorithms in a software should interact
APIs in the World Wide Web
From a web development perspective, APIs are often a set of HTTP requests and the according HTTP responses, which are often encoded in the XML or JSON format. An alternative to HTTP-requests and -responses is the usage of WebSockets, which is an advanced technology that opens an interactive communication session between a server and a client and eliminates the need for polling the server permanently. Almost every large online service offers at least one API to developers, in order to make possible third-party applications that use functions or data from the original service. Examples for web APIs are: • Facebook’s Graph API: It allows reading and writing Facebook user’s data, if the user authorizes the third-party app to do so. • YouTube Data API: Integrate YouTube features into an application, e.g. upload a video, manage a playlist, etc. • Google Maps API: A lot of things are possible with the API of Google Maps, e.g. putting a map on a website, finding information about places, getting directions and converting GPS coordinates into street addresses.
APIs of Cryptocurrency Exchanges
As stated before, the most important aspect of Blackstone Arbitrage is communicating with exchanges. Most cryptocurrency exchanges publicly offer APIs, and many of them are also well documented. Some exchange APIs partially or fully lack documentation, a few are not even mentioned on their website, but are only offered after asking for them in person. An example for such an undocumented API is Blackstones WebSocket API. There are two main functionalities why Blackstone Arbitrage needs to interact with exchanges: • Market Data : reading current prices, recent trades as well as information on the trading volume and order book. • Order Management : adding or removing orders from the exchange, knowing when orders were partially or fully filled and executed. Blackstone Arbitrage is integrated with numerous exchanges. Custom adaptors were implemented, which connect to each individual exchange API in the most efficient way possible.
API Response Normalization
Each cryptocurrency exchange employs its own format and schema for the data that is sent from its API. These so-called API responses are then transformed into internal, standardized data structures, in a process that we call normalization. Normalization is an integral part of our system, as the algorithm needs meaningful, uniform data in order to operate properly. Unfortunately, the reliability of the exchange APIs is questionable. It can and probably will happen that one of their APIs will be facing a downtime for a certain period. Another problem that might occur - and one that is even harder to recognize - is that the data itself is erroneous, or something in the response structure was changed without warning. To avoid any follow-up mistakes on our side, which could be caused by such errors on the side of exchange APIs, we implemented a sophisticated suite of tests. Only API responses which pass these tests are considered successfully normalized. If normalization fails, the according data will not be further processed. This is also to ensure that a malicious actor who manages to take control over an exchange API cannot manipulate our system.
In the information technology industry, latency refers to the delay that occurs during transmission or processing of data. For example, it is the time span that passes between the moment you execute a command on your computer, and the bits of data travelling over the internet to the destination and finally getting processed there. Essentially, it is the amount of time it takes in a system to get a response to a request.
Why Latency Is a Problem
As highlighted, latency is the delay that occurs between the request being made and the response. When it comes to trading, it has a great impact on the profitability.
Traders and investors need to have an accurate snapshot of the market so that they can make prudent decisions. The high volatility means that prices are always highly fluctuating.
Therefore, an accurate reading and a fast transmission of instructions are both integral to making profits.
Most exchanges have a high latency. A high latency means that the delay between the requests and the results is considerable. The result tends to be inaccurate readings of the market.
If the chart suite used has a high latency, the trader is not aware of price changes. They may be seconds behind others making similar trades. These unexpected price changes can
cause serious losses. An example is a trader who wants to make a trade buying at 5.5 and selling at 7.0. If there is a high latency, his purchase request will be approved when the price
has already risen to 6.0. This reduces the profits. In the worst, case, if the transaction cost is greater than the margin, then the trade makes losses.
This is why low latency communication channels should be used with exchanges.
Compared to traditional financial markets, the terminals and network interfaces of crypto exchanges seem to be from a previous era.
There is huge potential for improvement, and Blackstone ARBITRAGE acquired lots of expertise in this area.
Our Latency Approach
Due to the evolving nature of our project, there are two ways of how we tackle the problem of latency. In the beginning,
our network structure consists of a data center, which is connected to numerous Virtual Private Servers (VPS) all over the world.
This star-network uses high-speed connections to the data center. We already have invested in Dedicated Internet Access (DIA) technologies,
which allows us to use custom routing paths that are 100% to 1000% faster than regular internet connections.
The VPS machines themselves are not interconnected, instead they are connected to different exchanges in the best way that is possible for
the respective exchange. Some of them already have a presence in the NY4, which is an advantage, because they can directly be cross-connected.
Not every one of our VPS nodes is connected to every exchange. However, in order to guarantee a fail-safe system, we create redundancy by connecting at
least two different nodes via independent VPS services to one exchange. If one VPS service fails, the second one will keep working,
so there will be no downtime for this exchange in our system.
By minimizing the physical distance between the servers of the exchange and their according VPS, latency can be reduced by a factor of 100.
This is why we selected VPS services that have their servers in close proximity to the servers of exchanges.
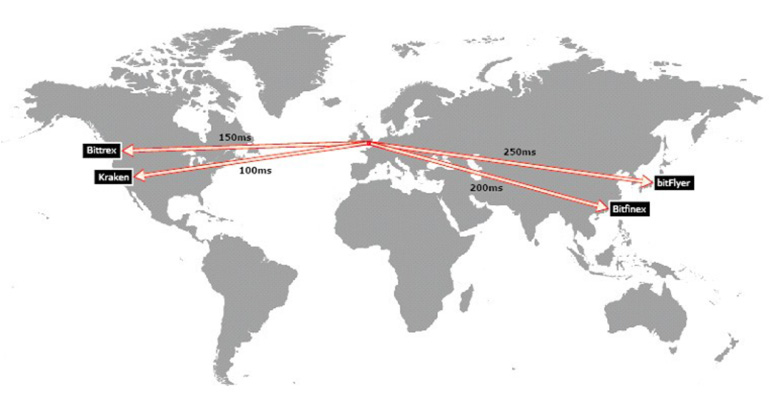
Illustration 12: If you are located in London and you try to get market data from four cryptocurrency exchanges - e.g. Kraken, Bittrex, bitFlyer and Bitfinex - the total latency would add up to 700ms on average.
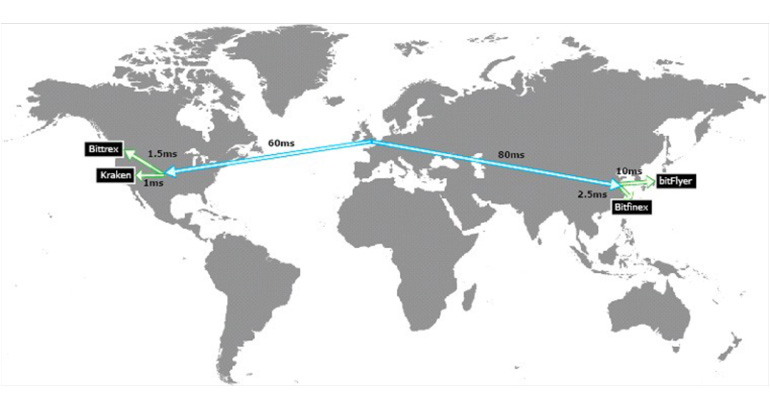
Illustration 13: With the improved, VPS-based solution that Blackstone Arbitrage is using, this only amounts to 295ms. In this example, Latency is cut by more than half
Beginning with the third stage of Blackstone ARBITRAGE, the network structure will become more decentralized. The Blackstone wallet, which already was capable of acting as a node in the Blackstone blockchain by staking,
will get an additional feature, which can turn the users personal computer into a node of our arbitrage trading network (see Wallet).
Nodes with a low latency to a given exchange are then preferred to obtain current market data from the exchange, while nodes with high computing power are used for calculations.
Each owner of a node is rewarded according to what the node contributes to the whole system. This creates an incentive to run specialized nodes, which are actually useful to the
network and thus profitable for the entire community.
In the development process, it was important to us to get feedback from real users early. For that reason, it was an early goal to get a prototype up and running, so that beta tests with external users could be conducted. This prototype was capable of spotting arbitrage opportunities on three exchanges (Kraken, Bitfinex and GDAX), and capitalizing on them by simultaneously buying on one exchange and selling on another one. It was the proof of concept for the same arbitrage pairs trading principle, which is going to launch for the public in stage 1 but with more exchanges
System Architecture
The hardware of the prototype consisted of a couple of private servers on a single location. Towards the end of the beta phase, this was improved in order to avoid downtimes by redundancy (see stage 1)
Routing
The network structure was a simple star-network with a single point of failure in the center. This marked the starting point of our journey towards decentralization. We would not keep the network with such a high grade of centralization, but it allowed us to bootstrap the product, get results fast and incorporate the users’ feedback in quick iterations.
Latency
Due to the compromise mentioned above, latency was still a hindering factor with the prototype. Experiments with additional VPS close to exchanges showed the effectivity of this approach, which would become standard in stage 1.
Stage 1 incorporates the two most important learnings from the beta phase: the importance of low latency for fast order execution, and the importance of liquidity on the various exchange accounts. Arbitrage pairs trading works best, when the accounts of the according currency pair already have a sufficiently high balance, so that no intermediate currency conversion are necessary. In this phase, investors profit from simple arbitrage between the same instrument on two different exchanges, by buying low and selling high at the same time.
System Architecture
For our production ready system, we are employing a cloud of private servers on multiple locations. There are two different types of servers: Ones for communication with exchanges, and ones for processing market data and making decisions in terms of which arbitrage opportunity should be realized in which way. Failover systems ensure that there is no downtime, unless the majority of the internet itself faces an outage.
Routing
While still relying on a high grade of centralization, there is a significant improvement compared to the early beta phase: Communication with exchanges happens via redundant VPS servers, which have a high-speed connection to our data centers, where our algorithms run on upgraded hardware. The failure of one VPS service has no immediate negative impact on the system as a whole
Latency
By using VPS services in close proximity to exchange servers, retrieving market data and getting orders executed is much faster. Through Dedicated Internet Access technologies, latency between the various VPS servers and our own hardware is kept at a minimum.
In the next stage, an additional arbitrage strategy gets introduced. The novelty here is that profit is not just generated by trading the asset itself, but additionally by trading futures of the asset. This means that it becomes possible to realize arbitrage opportunities without the need to have funds of the given currency for immediate disposal. Instead of buy- and sell-orders, so called short- and long-orders are used.
System Architecture
Since only a few crypto exchanges support trading futures at the moment, the main change here is that further VPS services get added to handle the increased traffic. The first exchanges that are affected by this are Bitmex and Bitfinex
Routing
No substantial changes are planned for this stage.
Latency
We will reduce latency further by upgrading hardware components and switching to better VPS services, as soon as they are available
Until now, the arbitrage system relied on the immediate availability of a profitable trade in just one step.
Price spreads for trading pairs were monitored, along with other relevant parameters such as bid/ask spreads,
volume, order books and expected slippage.
 Our algorithm treats arbitrage as a mathematical problem, where possible solutions exist in a so-called solution room.
The visualization above shows a simple two- dimensional representation of the Bitcoin/US-Dollar price spread. By selling BTC on Bitstamp, and buying the same amount on Bitfinex,
we could theoretically increase the US Dollar value of our BTC holdings by 0.31%. Practically, however, more things need to be taken into account:
• What is the spread between ask- and bid-orders on each exchange?
• What is the trading volume on each exchange?
• Which fees do the exchanges take?
• How much funds are currently available?
• What does the order book look like? What is the expected slippage for my order size?
Blackstone Arbitrage’s algorithm is aware of all these constantly changing parameters. Data is continuously retrieved through exchange APIs, gets sent through normalization, and finally gets
assigned its place in a multi-dimensional solution room The main innovation of stage 3 - Arbitrage Chain Trading - is possible by adding another dimension to the equation: time itself.
Instead of just focusing on the current status of the market in the present moment, probabilistic predictions for the future get introduced.
Due to the difficult nature of such an undertaking, the time-frame of these predictions are limited to a couple of seconds into the future.
However, a few seconds is enough time to conduct a series of arbitrage trades, where the output of one trade becomes the input of the next one.
The routes for possible arbitrage opportunities are exponentially increased, and there is huge potential to optimize for profitability by adding
computing power to the system. More computing power means that more data can be arranged in a larger multi- dimensional solution room,
and also that the time horizon of possible trade chains is increased. The Blackstone wallet will be upgraded with a feature,
which enables anyone to contribute computing power and get rewarded with Blackstone coins. This creates a self-regulating ecosystem, where computing power gets added as long as it leads to increased arbitrage profits.
This is where the decentralizing aspect of Blackstone Arbitrage’s arbitrage revolution starts to unfold.
Our algorithm treats arbitrage as a mathematical problem, where possible solutions exist in a so-called solution room.
The visualization above shows a simple two- dimensional representation of the Bitcoin/US-Dollar price spread. By selling BTC on Bitstamp, and buying the same amount on Bitfinex,
we could theoretically increase the US Dollar value of our BTC holdings by 0.31%. Practically, however, more things need to be taken into account:
• What is the spread between ask- and bid-orders on each exchange?
• What is the trading volume on each exchange?
• Which fees do the exchanges take?
• How much funds are currently available?
• What does the order book look like? What is the expected slippage for my order size?
Blackstone Arbitrage’s algorithm is aware of all these constantly changing parameters. Data is continuously retrieved through exchange APIs, gets sent through normalization, and finally gets
assigned its place in a multi-dimensional solution room The main innovation of stage 3 - Arbitrage Chain Trading - is possible by adding another dimension to the equation: time itself.
Instead of just focusing on the current status of the market in the present moment, probabilistic predictions for the future get introduced.
Due to the difficult nature of such an undertaking, the time-frame of these predictions are limited to a couple of seconds into the future.
However, a few seconds is enough time to conduct a series of arbitrage trades, where the output of one trade becomes the input of the next one.
The routes for possible arbitrage opportunities are exponentially increased, and there is huge potential to optimize for profitability by adding
computing power to the system. More computing power means that more data can be arranged in a larger multi- dimensional solution room,
and also that the time horizon of possible trade chains is increased. The Blackstone wallet will be upgraded with a feature,
which enables anyone to contribute computing power and get rewarded with Blackstone coins. This creates a self-regulating ecosystem, where computing power gets added as long as it leads to increased arbitrage profits.
This is where the decentralizing aspect of Blackstone Arbitrage’s arbitrage revolution starts to unfold.
System Architecture
The core infrastructure of Blackstone Arbitrage still remains in use, and acts as the solid backbone of the system. The domain of order execution is still under central control, which means that in order to invest in arbitrage, it is still necessary to join one of Blackstone Arbitrage’s trading pools. New is the circumstance that market data gets retrieved and processed in a decentralized way. The system is extended by a P2P-network of computing nodes, which at the same time might act as staking nodes in the Blackstone blockchain.
Routing
Market data gets routed from Blackstone Arbitrage computing nodes specialized in retrieval to ones that are specialized in processing. From there, normalized data along with predictions enters the established arbitrage algorithm in our private cloud, where the decision-making happens. The order-executing core of Blackstone Arbitrage is not changed.
Latency
Latency will be further reduced by allowing nodes, which might have even lower latency than our VPS services, to contribute to the system. Since now there is an ecofinomic incentive to create such nodes, the system is able to keep latency at a low level in a self-regulatory way.
In this final stage, we will render the centralized arbitrage trading platform we provided up until this point obsolete. Of course, the Blackstone Arbitrage trading platform will not shut down, but we will allow - and even encourage! - other arbitrage trading platforms to emerge on top of the decentralized infrastructure that we have created. The new version of the Blackstone wallet will then have the capability to let users enter their personal API exchange credentials, so that they can execute orders using their own exchange accounts. Also, users have control over the algorithm they run. A community-driven marketplace for trading strategies will lead to a fruitful competition between arbitrageurs, which in the end optimizes for profitability and thus enriches all communities around the Blackstone blockchain. Users may form their own trading pools with each other. Different pools will compete for different types of investors. At this point, full decentralization has been reached. From now on the system runs sustainably on its own in a self-regulatory way, stabilizing the whole cryptocurrency market and offering attractive investment opportunities to everybody.
System Architecture
Routing
Only P2P routing algorithms play a role here. Routing in this stage can be compared to BitTorrent. Messages are propagated from one node to the next and self-healing algorithms make sure that paths are not blocked.
Latency
Latency may vary, depending on the actual nodes that are online. However, due to the Blackstone rewards for computing nodes, there is a strong incentive to run nodes with low latency.
The Whitepaper of the Blackstone Arbitrage Team gives a general overview about the current market situation, future predictions and their inefficiencies. In order to overcome these issues and establish the cryptomarket as more mature, certain problems have to be solved: lowering volatility, stabilizing market prices and increasing liquidity. All these problems were taken into consideration by developing the Blackstone Arbitrage Platform, which serves as a technical solution. Furthermore, it aims to involve retail investors into the automated arbitrage trading system, where invested money is aggregated and traded with a specialized algorithm to outweigh the inefficiencies of the market and additionally benefit from generated gains. Blackstone Arbitrage is already taking advantage of arbitrage opportunities with the working prototype. After reaching the soft cap early investors will have access to this prototype via the Blackstone Arbitrage Platform and can already benefit from our services before the end of the ICO. The goal of Blackstone Arbitrage is to give retail investors the possibility to invest in risk-free arbitrage trading by using specialized infrastructure with automated arbitrage software. Consequently, the increase of liquidity on major exchanges will help to stabilize the market and adapt crypto to the real world.
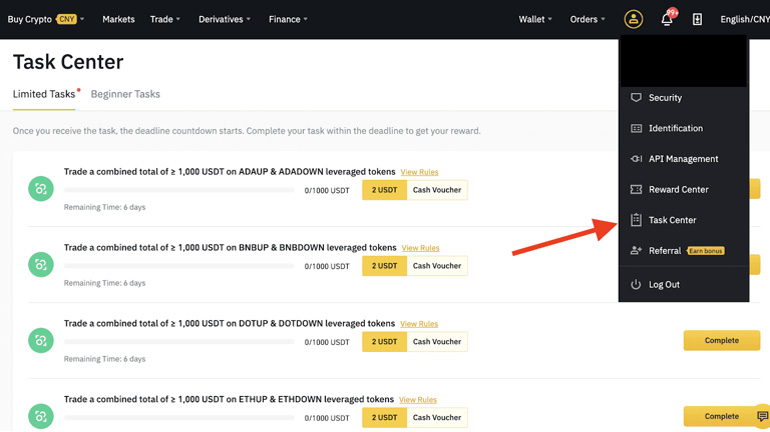
How to get a task
Binance tasks are challenges and criteria that a user can meet to gain some kind of reward. Examples of tasks include making a combined total amount of trades in a certain cryptocurrency, referring a friend, or taking part in some other promotional offer.
Getting a task
1. Log into your Binance account and click on your profile icon on the upper right corner. You will see the Task Center in the drop-down menu.
 You can also enter the task center in the Binance app by clicking the profile icon and then [Task Center].
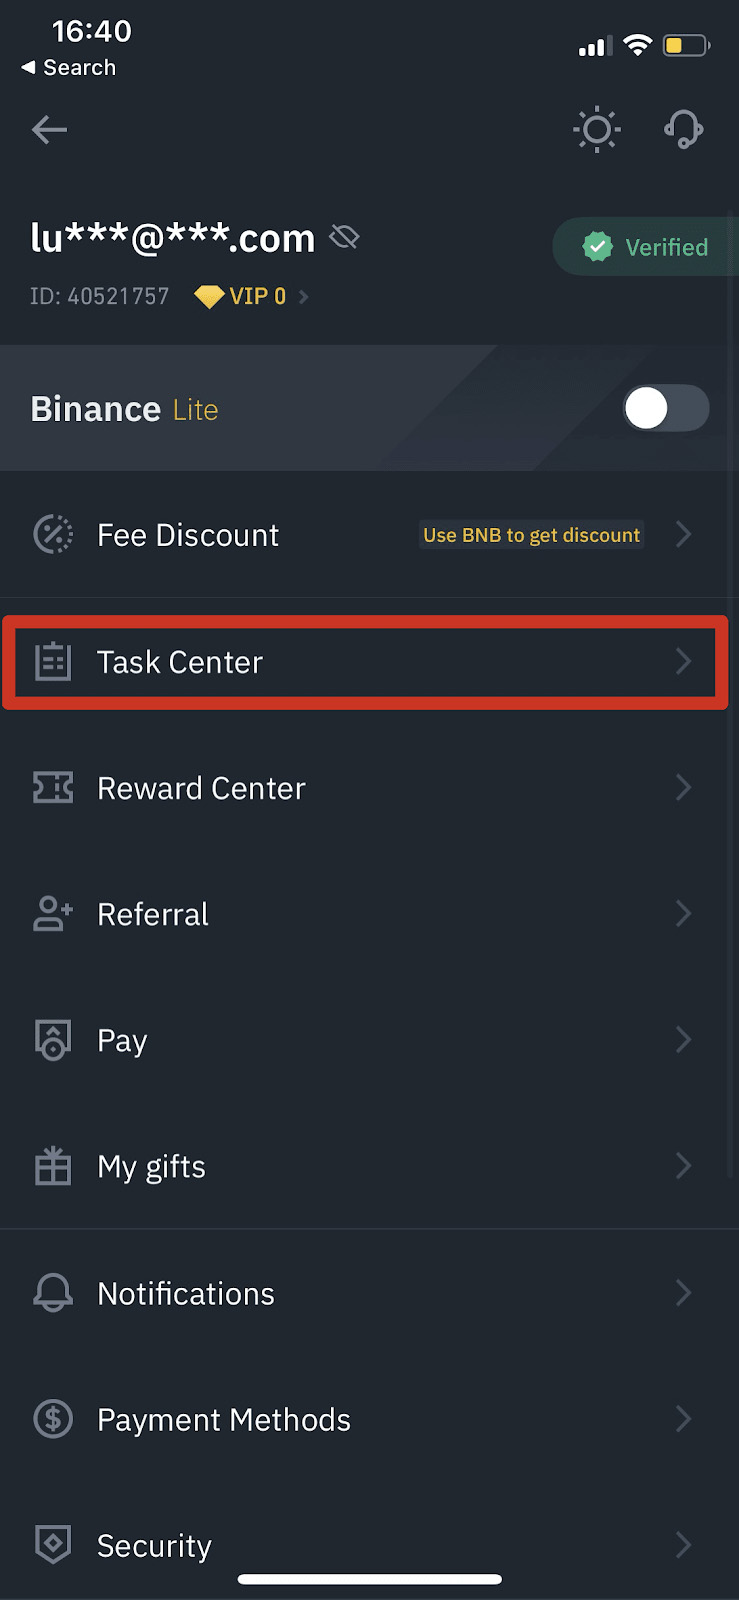 Note: Direct link to the task center: https://www.binance.com/en/my/task/list
2. Binance issues tasks to users via the Task Center daily or weekly. The tasks will be sent to specific users based on ongoing activities requirements.
When you receive a task, you will also automatically receive an "App Push", "Inmail" or "Email" reminder, such as "You've received a new task".
The push will redirect you to the task center to see the related task.
The Task Center home page will show you recent tasks that you’ve been assigned
How to complete the task
Binance tasks are challenges and criteria that a user can meet to gain some kind of reward.
Examples of tasks include making a combined total amount of trades in a certain cryptocurrency,
referring a friend, or taking part in some other promotional offer.
Once you are eligible for a reward, you must mark the task as complete in the Task Center.
You can find the Task Center by hovering over the profile icon on the top right hand side of the Binance homepage.

Completing your task and claiming your reward
1. Please check the task rules to make sure you have satisfied their requirements. Click the "Complete"
button to jump to the corresponding page to complete the task.
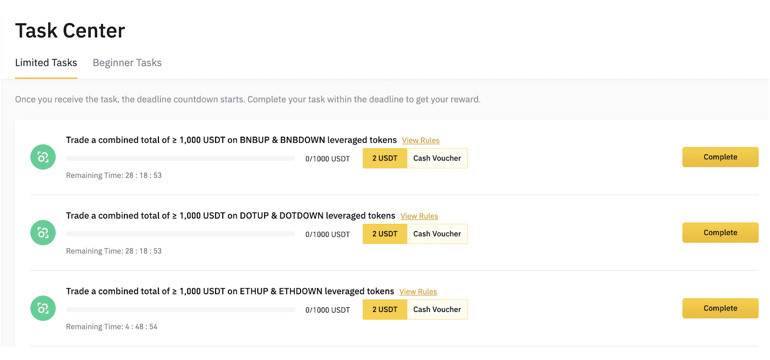 2. Pay attention to two important time-sensitive countdowns: "Remaining Time" and "Expiry Date".
"Remaining Time" refers to the time you have to complete the task.
"Expiry Date" refers to the time you have to redeem your reward after completing the task.
This is viewable in the Reward Center which will be covered later on.
Note that you won't be able to complete your task once you exceed the remaining time left.
Also, make sure to click the “Get Reward" button within the specified time after completing the task,
otherwise the reward is forfeited
2. Pay attention to two important time-sensitive countdowns: "Remaining Time" and "Expiry Date".
"Remaining Time" refers to the time you have to complete the task.
"Expiry Date" refers to the time you have to redeem your reward after completing the task.
This is viewable in the Reward Center which will be covered later on.
Note that you won't be able to complete your task once you exceed the remaining time left.
Also, make sure to click the “Get Reward" button within the specified time after completing the task,
otherwise the reward is forfeited
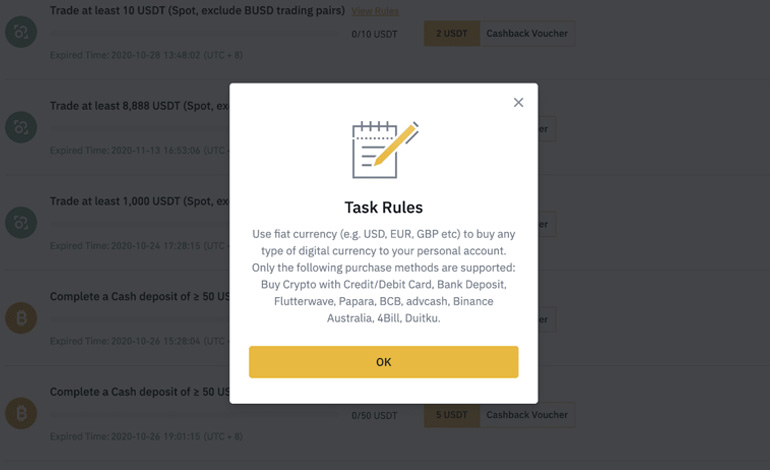
 3. After receiving a task, click the [Rules] button next to the task description to view its specific terms and conditions for completion.
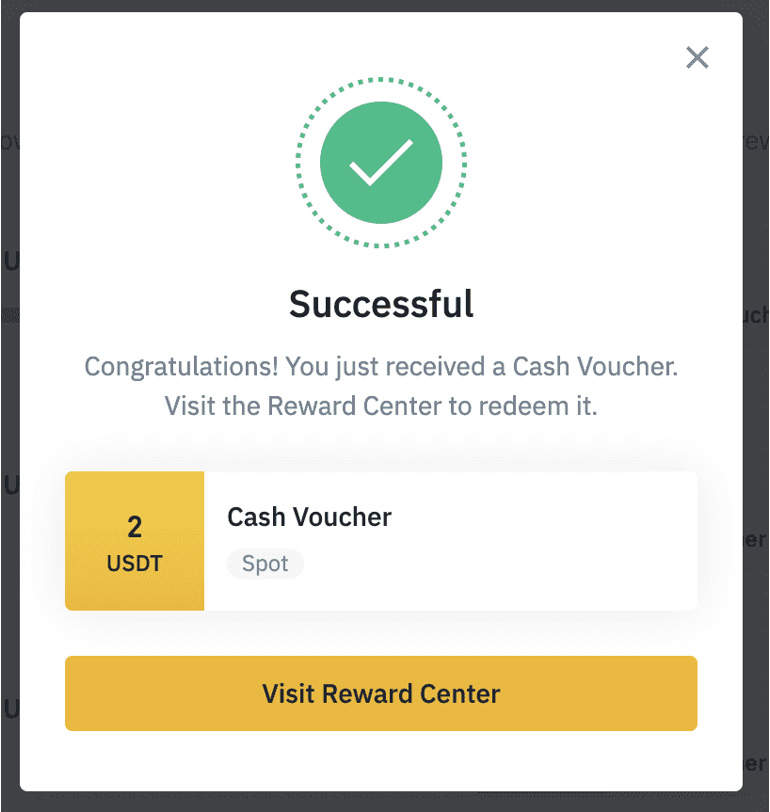
 4. After completing the task, return to the Task Center to check its completion status.
A "successful" pop-up window should appear if you have successfully met the task’s criteria. Click on [Visit Reward Center]
where you will be able to redeem your reward.
4. After completing the task, return to the Task Center to check its completion status.
A "successful" pop-up window should appear if you have successfully met the task’s criteria. Click on [Visit Reward Center]
where you will be able to redeem your reward.
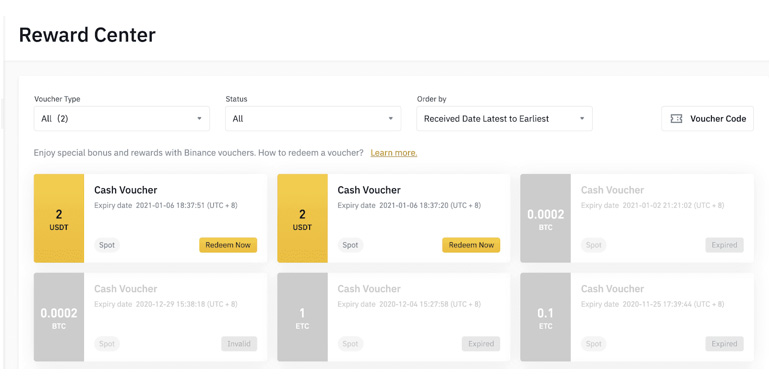
 5. Here in the Reward Center you’ll have an overview of all the vouchers you are able to redeem.
Simply click [Redeem Now] before the expiry date to receive your reward.
For more information about vouchers, please check our FAQ
5. Here in the Reward Center you’ll have an overview of all the vouchers you are able to redeem.
Simply click [Redeem Now] before the expiry date to receive your reward.
For more information about vouchers, please check our FAQ
Frequently Asked Questions
1. Why can't I see any tasks in the Task Center?
The Task Center automatically filters activities for users based on their levels, for example,
"beginner” users will possibly receive "beginner" tasks.
Please check the [Task Center] from time to time for available tasks. The countdown would start after receiving the task,
if you can complete it within the validity period, you can click [Get Reward] for rewards.
2. I have many Binance accounts, can I claim multiple tasks?
No, Task Center activities are only available to major accounts. You cannot claim repeated tasks or rewards. Rewards are limited.
Task Center restricts"bulk registration" users and prohibits users from receiving the same reward multiple times.
3. I have completed my task, but the Task Center shows that it is not completed.
Click [View Rules] next to the task to make sure that your task is completed according to the rules.
Task status and rewards are updated within 4 hours after completion, please check again later.
Make sure to click [Get Reward] before the task expires.
If you still cannot solve the problem, please contact Binance Support for assistance.
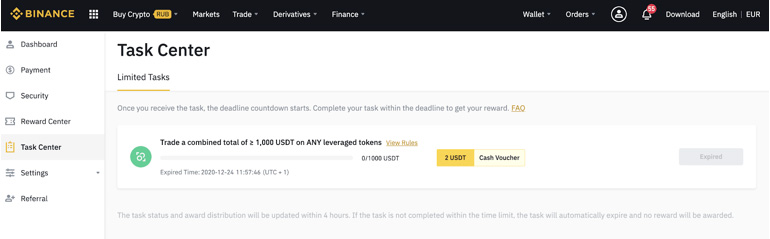
4. I completed a 100 USDT trade, but it displayed “99 USDT” instead. Why?
The quantity cumulated is converted into USDT and could be affected by market fluctuations. Therefore it might deviate from the actual order amount.
Task center conditions and terms of use
The task only takes effect when it appears in the [Task Center]. Even after the activity announcement, if there’s no task in the [Task Center], please wait. After receiving the task, please check the task "title" and "rules" before completing the task The task status and cumulative value will be updated within 4 hours. If the cumulative number is not updated, please wait patiently and refresh the page. When the task remains incomplete, please make sure that your operation is consistent with the task rules. If not, please contact us in time [Customer Service] After the task is completed, please return to [Task Center] and click on "get reward", then jump to [voucher center] to use voucher The cumulative value of completed tasks will be uniformly converted into USDT, so it will be affected by market fluctuations and there is a small deviation from the actual order The task center prohibits the use of all third-party plug-ins, illegal accounts, batch registration, self-deal, market manipulation, etc. If you’re found doing illegal activities, the task will be disqualified The final interpretation right belongs to Binance.
Binance Education
1. Open the Binance App and tap [Log In/Register].
 2. Tap [Register]. Enter the email address and password you’ll use for your account, and the Referral ID (if any).
Check the box next to [I Understand Binance’s Terms of Use] and tap [->].
2. Tap [Register]. Enter the email address and password you’ll use for your account, and the Referral ID (if any).
Check the box next to [I Understand Binance’s Terms of Use] and tap [->].
 Note:
Your password must contain at least 8 characters, including one uppercase letter and one number.
If you’ve been referred to register on Binance by a friend, make sure to fill in the Referral ID (optional).
Note:
Your password must contain at least 8 characters, including one uppercase letter and one number.
If you’ve been referred to register on Binance by a friend, make sure to fill in the Referral ID (optional).
3. Drag the slider to complete the Security Verification puzzle.
 4. You will receive a verification email in your inbox. Please enter the verification code within 10 minutes.
If you can’t find the email, click [Send Code] to get another email.
4. You will receive a verification email in your inbox. Please enter the verification code within 10 minutes.
If you can’t find the email, click [Send Code] to get another email.
 Note: For your own account security, we highly recommend you to enable two-factor authentication (2FA).
Binance supports both Google and SMS 2FA.*Before you start P2P trading, you need to complete
Identity Verification and 2FA authentication first.
Note: For your own account security, we highly recommend you to enable two-factor authentication (2FA).
Binance supports both Google and SMS 2FA.*Before you start P2P trading, you need to complete
Identity Verification and 2FA authentication first.
1. Go to Binance.com and click [Register].
 2. Click [Mobile] and enter the mobile number and password for your account, and the Referral ID (if any).
Read and agree to the Terms of Use and click [Create Account].
2. Click [Mobile] and enter the mobile number and password for your account, and the Referral ID (if any).
Read and agree to the Terms of Use and click [Create Account].
 Note:
For account safety, the password should consist of at least 8 characters, including 1 uppercase character and 1 number.
If you have been referred by a friend, please enter your friend’s referral ID. Once you have registered, the referral can not be changed.
Note:
For account safety, the password should consist of at least 8 characters, including 1 uppercase character and 1 number.
If you have been referred by a friend, please enter your friend’s referral ID. Once you have registered, the referral can not be changed.
3. Complete the Security Verification.
 4. The system will send an SMS verification code to your mobile phone. Please enter the 6-digit verification code within 30 minutes.
If you can’t receive it, click [Resend], or click [Please try voice verification] to use voice verification instead.
4. The system will send an SMS verification code to your mobile phone. Please enter the 6-digit verification code within 30 minutes.
If you can’t receive it, click [Resend], or click [Please try voice verification] to use voice verification instead.
 5. Congratulations, you have successfully registered on Binance.
 6. To enhance your account security, click [Go to Dashboard] to enable two-factor authentication (2FA), including phone verification and Google verification.

1. Go to Binance.com and click [Register].
 2. On the registration page, enter your email address, create a password for your account,
and enter the Referral ID (if any). Then, read and agree to the Terms of Service and click [Create Account].
2. On the registration page, enter your email address, create a password for your account,
and enter the Referral ID (if any). Then, read and agree to the Terms of Service and click [Create Account].
 Note:
Your password must be a combination of numbers and letters. It should contain at least 8 characters, one UPPER CASE letter, and one number.
If you’ve been referred to register on Binance, make sure to fill in the correct Referral ID here.
Note:
Your password must be a combination of numbers and letters. It should contain at least 8 characters, one UPPER CASE letter, and one number.
If you’ve been referred to register on Binance, make sure to fill in the correct Referral ID here.
3. Complete the Security Verification.
 4. The system will send a verification code to your email. Please enter the verification code within 30 minutes.
If you can’t find the email in your inbox, please check your other mail folders as well, or click [Resend Email] to resend.
4. The system will send a verification code to your email. Please enter the verification code within 30 minutes.
If you can’t find the email in your inbox, please check your other mail folders as well, or click [Resend Email] to resend.
 5. Congratulations, you have successfully registered on Binance.
 6. To enhance your account security, click [Go to Dashboard] to enable two-factor authentication (2FA),
including phone verification and Google verification.
6. To enhance your account security, click [Go to Dashboard] to enable two-factor authentication (2FA),
including phone verification and Google verification.

Binance Referral Program allows you to invite friends and earn up to 40% commission every time your friends make a trade on Binance.
You can earn commission from both the Spot and Futures market. Learn how to earn the Spot referral bonus in the step-by-step guide below.
1. Log into your Binance account and click [Profile] - [Referral]. You can also access it from here
 2. Here you can see your referral ID and referral link. Click [+ Generate your link] to customize the referral percentage.
 3. Choose the spot referral commission rate. The default spot referral rate is 20%, meaning that you get 20% of the spot trading fees paid by the
friends you refer.Please note that accounts with a daily average account balance of 500 BNB or more can get 40% spot referral commission,
while accounts with a daily average account balance of less than 500 BNB can get 20% spot referral commission.You can also add a note for the link,
and set it as your default rate. Click [Generate your link].
3. Choose the spot referral commission rate. The default spot referral rate is 20%, meaning that you get 20% of the spot trading fees paid by the
friends you refer.Please note that accounts with a daily average account balance of 500 BNB or more can get 40% spot referral commission,
while accounts with a daily average account balance of less than 500 BNB can get 20% spot referral commission.You can also add a note for the link,
and set it as your default rate. Click [Generate your link].
 4. After customizing the commission rate and commission kickback rate, click the [Copy] icon next to your referral ID or referral link to invite your friends.
 You can also click [Invite Now] to share your referral QR code. You can download the image in different sizes, or click on the various social media icons to share directly.
 5. Once your friends successfully register on Binance and start trading, referral commissions will start to calculate in real-time and will be transferred to the respective
Binance accounts every hour.6. You can check the details of your referrals by navigating through the different tabs from the top menu.
5. Once your friends successfully register on Binance and start trading, referral commissions will start to calculate in real-time and will be transferred to the respective
Binance accounts every hour.6. You can check the details of your referrals by navigating through the different tabs from the top menu.
 Notes :
You can generate respective referral links and referral codes for Spot via here, and Futures via here.
For more information on the Referral Program, please visit the Referral Program FAQ. To earn both Spot and Futures
commission when referring a friend you will need to ensure you have first opened a Futures account. If you refer a friend using your Spot referral link,
but you have not yet opened a Futures account, then you will only earn a commission from their Spot trading fees.
Binance reserves the right to adjust the rules of the referral program at any time.
Notes :
You can generate respective referral links and referral codes for Spot via here, and Futures via here.
For more information on the Referral Program, please visit the Referral Program FAQ. To earn both Spot and Futures
commission when referring a friend you will need to ensure you have first opened a Futures account. If you refer a friend using your Spot referral link,
but you have not yet opened a Futures account, then you will only earn a commission from their Spot trading fees.
Binance reserves the right to adjust the rules of the referral program at any time.
There are a couple of ways to disable your Binance account should you notice any suspicious activity.
If you can access your account:
1. Open the Binance App and go to [Account] - [Security] - [Disable Account].


 2. Read the reminders carefully and tap [Disable Account].

You can disable your account from the website too.
1. Log in to your account on Binance.com and go to [Profile] - [Security].
 2. Click [Disable account].
 3. Read the reminders carefully and click [Disable this account].
 If you can’t access your account:
Search for the following emails from Binance in your email client and click the [Disable your account] button to temporarily disable your account.
[Binance] Password Reset
[Binance] Successful Login
[Binance] IP Verification
[Binance] Authorize New Device
[Binance] Reset SMS Authenticator
[Binance] Reset Google Authenticator
[Binance] Confirm Your Withdraw Request
Take the IP change notification email for example:

If your account is frozen or locked, you may unlock it via the website or app.Please follow the steps below to reactivate your account using the app.
1. Open the Binance app, enter your account information, and click [Log in]. If you have already enabled security verification, you may click [Get code]
and enter all the required codes. Then, click [Reactive Now] to start the account reactivation process.
 Note: If your account was disabled less than 2 hours ago, you cannot unlock it – please try again after 2 hours.
 2. Please read the reminder carefully, and click on [Reactivate Account] to proceed further.
3. You will need to pass security verification:
2. Please read the reminder carefully, and click on [Reactivate Account] to proceed further.
3. You will need to pass security verification:
 Please click on [Get code] and enter all the required codes.
For account safety reasons, the Phone verification code and email verification code will be valid only for 30 minutes. Please check and enter the relevant codes in time.
 4. After clicking on [Submit], please follow the instructions to complete the different forms of verification below:
Note:Different users will perform different operations
based on account status and related information.Answering Security Questions:Please read the instructions carefully before clicking on [Start answering questions].

 ID verification:Please choose the type of ID document, and scan it.
 Facial verification:Please pay attention to the tips and click on [Begin Verification].
 After submission, please read the notice, click [Got it!], and wait patiently for the result.


If your account is frozen (or “locked”), please follow the below steps to reactivate your account.
Please visit https://www.binance.com and Log In to your account. You should see this dialog box. Click the【Unlock】button to start the account reactivation process.
 Read the reminder carefully and tick the respective boxes once you accept the terms and given information.
Click on the【Reactivate Account】button to proceed further.
Read the reminder carefully and tick the respective boxes once you accept the terms and given information.
Click on the【Reactivate Account】button to proceed further.
 After clicking, follow the instructions on the page to complete the below verifications:
Answering Security Questions:
After clicking, follow the instructions on the page to complete the below verifications:
Answering Security Questions:

 Confirmation Email:
Once you submit your data, our system will send you an automatic confirmation email. Please click 【Confirm Reactivate】 to proceed further.
Confirmation Email:
Once you submit your data, our system will send you an automatic confirmation email. Please click 【Confirm Reactivate】 to proceed further.

 ID verification:
 Click【Next Step】to start the verification.
Please choose the issuing country of your ID and select your ID type:
 Upload the front side of your ID document
 Upload the back side of your ID document.
 Upload a selfie with your face being clearly visible (we are not accepting screenshots or edited pictures).
 Facial verification:
 We will review your application as soon as possible once you have completed the verifications.
* Different users will perform different operations based on account status and related information.
We will review your application as soon as possible once you have completed the verifications.
* Different users will perform different operations based on account status and related information.
Here below is the guide for facial verification:
Go through the process by scanning the QR code with the Binance mobile app on Android or iOS.
For Android app:
Open your Binance app, navigate to [Account] section and tap on [Scan] button or tap the Scan symbol on the upper left corner on the home page.
 For iOS APP:
Open your Binance app and navigate to [Home] section and tap on the [Scan] button or tap the Scan symbol on the upper right corner on the home page.

Whenever you trade, there will be some “dust” - a small balance left behind in your account wallet after the transaction.
At Binance, you can convert dust with a valuation below 0.0012 BTC to BNB once every 6 hours in these easy steps.1.
Log in to your Binance account and click [Wallet] - [Fiat and Spot].
 2. Click [Convert Small Balance to BNB] to check which assets in your account can be converted to BNB.
3. Here you can see the list of assets available to convert into BNB. Check the box next to the assets you wish to convert and click [Convert].
To check your conversion history, click [Conversion History].
2. Click [Convert Small Balance to BNB] to check which assets in your account can be converted to BNB.
3. Here you can see the list of assets available to convert into BNB. Check the box next to the assets you wish to convert and click [Convert].
To check your conversion history, click [Conversion History].

 Please note:
You can convert as many assets in one conversion as you wish.
Unlisted/delisted tokens cannot be converted.
You can make one small balance conversion every 6 hours.
Please note that the conversion value suggested by the system is just an estimation. The selected assets will be converted to BNB according to the current market price when you click [Confirm].
If there is a 5% (or greater) fluctuation during the conversion, for the benefit of our users, the conversion process will not proceed. Please try again later.
Sub-account allows you to trade through multiple accounts.
You can use it to clearly divide responsibilities and manage
transactions more efficiently and securely.
 Sub-account function is available for corporate account users and VIP1 (or higher) personal account users (KYC identity authentication and Binance/Google authentication are required).
Sub-account functions and management
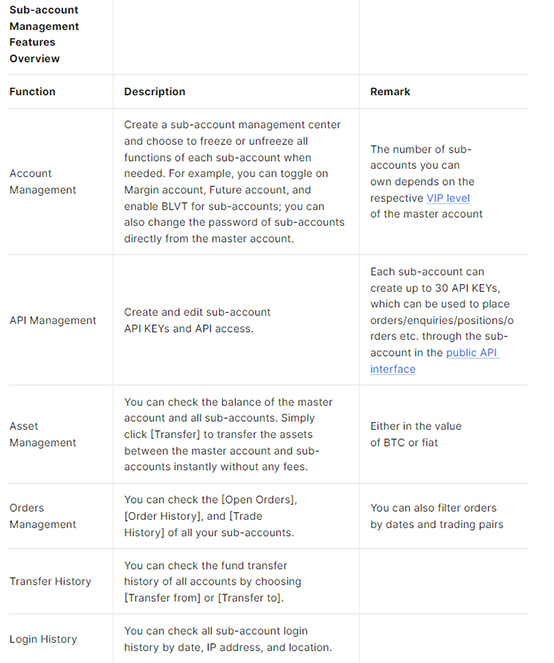 How to create a Sub-Account?
1. Click [Profile] - [Sub-Accounts].
 2. Click [+ Create Sub Account].
 3. Enter the email address for your sub-account. You can use either a regular email or a virtual email. Then create a password and click [Create Sub Account].
 Tips:
Tips:
Please note that you need to verify your email address after account creation;
When you create a sub-account with a virtual email, that sub-account can only be operated by the master account through API.
4. Once the sub-account is successfully created, it can be viewed in the account management list, where you can manage your account permissions.

 How to manage sub-account permissions?
API Management: To create a sub-account API KEY, go to [API Management] and click [Create API].
You can also edit the sub-account API permissions here. Simply click [Modify] to edit.
 Asset Management: You can check the balance of the master account and all sub-accounts, either in the value of BTC or a fiat currency.
Simply click [Transfer] to transfer assets between the master account and sub-accounts instantly without any fees.
Asset Management: You can check the balance of the master account and all sub-accounts, either in the value of BTC or a fiat currency.
Simply click [Transfer] to transfer assets between the master account and sub-accounts instantly without any fees.


Order Management: You can check [Open Orders], [Order History], and [Trade History] of all your sub-accounts. You can also filter orders by dates and trading pairs.

Transfer History: You can check the fund transfer history for all accounts by choosing [Transfer from] or [Transfer to].

Login History: You can check all sub-account login history by date, IP address, and location.

You can reset your account password from the Binance website or App.
Please note that for security reasons, withdrawals from your account
will be suspended for 24 hours after password reset.1. Go to Binance.com and click [Login].

If you are using the App, click [Log In/Register].
 2. On the login page, click [Forgot Password?].
 3. Click [Continue]. Please note that for security reasons, withdrawals from your account will be suspended for 24 hours after password reset.
 4. Enter your account email or mobile number and click [Next].
 5. Complete the security verification puzzle.
 6. Enter the verification code you received in your email or SMS, click [Next] to continue.
 Notes
Notes
If your account is registered with an email and you have enabled SMS 2FA, you can reset your password through your mobile number.
If your account is registered with a mobile number and you have enabled email 2FA, you can reset the login password using your email.
7. Enter your new password and click [Next].
 8. Your password has been reset successfully. Please use the new password to log in to your account.

If you need to file taxes for your cryptocurrency investments, you can generate a statement of
your Binance account to perform tax calculations.
1. Log in to your Binance account and click [Wallet] - [Fiat and Spot].
 2. Click [Transaction History]
 3. Click [Generate all statements].
 4. Select the range, account, and coin you would like to display on the statement, then click [Generate].
Please note that as generating records consumes server resources,
each user can only generate up to 4 times per month.
4. Select the range, account, and coin you would like to display on the statement, then click [Generate].
Please note that as generating records consumes server resources,
each user can only generate up to 4 times per month.
 5. After the statement is generated, you will receive an SMS or email reminder.

 6. Now go to [Transaction History] - [Generate all statements].
Click [Download] next to the statement generated.Please note that the statement download link will only be stored for 7 days.
Please download it as soon as possible.
6. Now go to [Transaction History] - [Generate all statements].
Click [Download] next to the statement generated.Please note that the statement download link will only be stored for 7 days.
Please download it as soon as possible.

Where can I get my account verified?
You can access the Identity Verification from [User Center] - [Identification] or access it directly from here.
You can check your current verification level on the page, which determines the trading limit of your Binance account.
To increase your limit, please complete the respective Identity Verification level.
 Why do I need to complete Identity Verification?
Identity Verification or Know Your Customer (KYC) standards are designed to protect your account against fraud, corruption,
money laundering, and terrorist financing.All new users are required to complete [Verified] to access Binance products and service offerings,
including cryptocurrency deposits, trades, and withdrawals.Existing users who haven’t completed [Verified] verification will have their account
permissions temporarily changed to “Withdraw Only,” with services limited to fund withdrawal, order cancelation, position close, and redemption.
Based on your region or selected payment channels, you may need to enhance your identity verification level to improve your account security.
For more details, please refer to Why Do I Need to Complete Identity Verification.
How to complete Identity Verification? A step-by-step guide
1. Log in to your Binance account and click [User Center] - [Identification].
For new users, you may click [Get verified] on the homepage directly.
 2. Here you can see [Verified], [Verified Plus], and [Enterprise Verification] and their respective deposit and withdrawal limits.
The limits vary for different countries. You can change your country by clicking the button next to [Residential Country/Region].
2. Here you can see [Verified], [Verified Plus], and [Enterprise Verification] and their respective deposit and withdrawal limits.
The limits vary for different countries. You can change your country by clicking the button next to [Residential Country/Region].
 3. After that, click [Start Now] to verify your account.
 4. Select your country of residence. Please ensure that your country of residence is consistent with your ID documents.
 You will then see the list of verification requirements for your specific country/region. Click [Continue].
 5. Enter your personal information and click [Continue].Please make sure that all the information entered is consistent with your ID documents.
You won’t be able to change it once confirmed.
6. Next, you will need to upload pictures of your ID documents. Please choose the type of ID and the country your documents were issued.
Most users can choose to verify with a passport, ID card, or driver’s license.
Please refer to the respective options offered for your country.
5. Enter your personal information and click [Continue].Please make sure that all the information entered is consistent with your ID documents.
You won’t be able to change it once confirmed.
6. Next, you will need to upload pictures of your ID documents. Please choose the type of ID and the country your documents were issued.
Most users can choose to verify with a passport, ID card, or driver’s license.
Please refer to the respective options offered for your country.

 7. Follow the instructions to upload photos of your document. Your photos should clearly show the full ID document.
For example, if you are using an ID card, you have to take photos of the front and back of your ID card.
7. Follow the instructions to upload photos of your document. Your photos should clearly show the full ID document.
For example, if you are using an ID card, you have to take photos of the front and back of your ID card.
 8. After uploading the document photos, the system will ask for a selfie. Click [Upload File] to upload an existing photo from your computer.
 9. After that, the system will ask you to complete face verification. Click [Continue] to finish face verification on your computer.
Please do not wear hats, glasses, or use filters, and make sure that the lighting is sufficient.
9. After that, the system will ask you to complete face verification. Click [Continue] to finish face verification on your computer.
Please do not wear hats, glasses, or use filters, and make sure that the lighting is sufficient.
 Alternatively, you can move your mouse to the QR code on the bottom right to complete the verification on the Binance App instead.
Scan the QR code via your App to finish the face verification process.
Alternatively, you can move your mouse to the QR code on the bottom right to complete the verification on the Binance App instead.
Scan the QR code via your App to finish the face verification process.
 10. After completing the process, please wait patiently. Binance will review your data in a timely manner.
Once your application has been verified, we will send you an email notification.
Please enter your basic information and complete photo verification within 15 minutes. Do not refresh your browser during the process.
10. After completing the process, please wait patiently. Binance will review your data in a timely manner.
Once your application has been verified, we will send you an email notification.
Please enter your basic information and complete photo verification within 15 minutes. Do not refresh your browser during the process.
You may attempt to complete the Identity Verification process up to 10 times per day.
If your application has been denied 10 times within 24 hours, please wait 24 hours to try again.
To apply for a corporate account, please follow the step-by-step guide below:
1. Log in to your Binance account and go to [Profile] - [Identification]. Click [Switch to Enterprise Account].
 Please note that if your email has already been linked to a Personal Account, it cannot be upgraded to a Corporate Account.
This, please make sure that you submit the Corporate Account application with an unverified account.
2. Click [Verify].
Please note that if your email has already been linked to a Personal Account, it cannot be upgraded to a Corporate Account.
This, please make sure that you submit the Corporate Account application with an unverified account.
2. Click [Verify].
 3. Select your corporate type and click [Change corporate type].
 4. You will be asked to prepare a list of documents before you start the enterprise verification process.
The required documents vary depending on the corporate type you select.Currently, we support Bulgarian,
Russian, French, Portuguese, Polish, Slovenian, Italian, Hungarian, Swedish, Dutch, Spanish.
If the corporate documents are in other languages, please provide the original documents together with
official English versions.For example:
4. You will be asked to prepare a list of documents before you start the enterprise verification process.
The required documents vary depending on the corporate type you select.Currently, we support Bulgarian,
Russian, French, Portuguese, Polish, Slovenian, Italian, Hungarian, Swedish, Dutch, Spanish.
If the corporate documents are in other languages, please provide the original documents together with
official English versions.For example:
 You can click [Begin Verification] to continue, or [Switch Corporate type] to select a different type.
5. Please fill in the basic information of your company and click [Continue]. You can also [Save as draft] anytime during the verification process.
 6. Please upload the corporate documents based on the requirements.
 7.1 If you need to verify directors, enter the information of your directors and upload the required documents.Please note:
For IDs, please upload a copy of your passport or ID card to prove your nationality/jurisdiction (driver’s license is not accepted);
For selfies, please upload in full color. Do not use screenshots, photocopies, or photoshopped/filtered images.
We support jpeg/jpg and png formats.
7.1 If you need to verify directors, enter the information of your directors and upload the required documents.Please note:
For IDs, please upload a copy of your passport or ID card to prove your nationality/jurisdiction (driver’s license is not accepted);
For selfies, please upload in full color. Do not use screenshots, photocopies, or photoshopped/filtered images.
We support jpeg/jpg and png formats.
 7.2 If you don’t need to verify directors (for certain entity types), enter the information of your Ultimate Beneficial Owners (UBO) and upload the required documents.
 8. Enter the information of your authorized dealers/traders and upload the required documents.
Toggle on the [Main] button if the dealer/trader is the one that uses the exchange most frequently.
Please note that the Main Dealer is required to perform Face Verification in the next step.
8. Enter the information of your authorized dealers/traders and upload the required documents.
Toggle on the [Main] button if the dealer/trader is the one that uses the exchange most frequently.
Please note that the Main Dealer is required to perform Face Verification in the next step.

 9. You can open your Binance App to scan the QR code and complete the Identity Verification on your phone or click [Use PC to do verification] to
complete on your computer.Please do not wear hats, glasses, and do not use filters.
You should perform it under sufficient lighting.After that, click [I have completed this on my phone].
9. You can open your Binance App to scan the QR code and complete the Identity Verification on your phone or click [Use PC to do verification] to
complete on your computer.Please do not wear hats, glasses, and do not use filters.
You should perform it under sufficient lighting.After that, click [I have completed this on my phone].
 10. Read and agree to the declaration. Check the box next to [I fully understand the declaration] and click [Continue].
 11. Your application is successfully submitted. Please wait patiently for us to review.

1. Log into your Binance account and click [Profile] - [Security].
 2. Click [Enable] next to [Google Authenticator].
 3. You will be redirected to another page. Follow the step-by-step instructions to enable Google Authenticator.
3.1. Download and install the Google Authenticator App on your mobile device. After you’ve installed the App, click [Next] to continue.
 3.2. You will now see a QR code on your screen.
 Open the Google Authenticator App and tap on the [+] button on the bottom right of your screen to scan the QR code.
Then click [Next].If you are unable to scan it, you can manually enter the setup key.
Open the Google Authenticator App and tap on the [+] button on the bottom right of your screen to scan the QR code.
Then click [Next].If you are unable to scan it, you can manually enter the setup key.
 3.3. Save the backup key on paper. This Key will allow you to recover your Google Authenticator in case you lose your phone.
 3.4. Verify your Google Authenticator with your other 2FA devices.
 3.5. You have successfully enabled Google Authenticator to protect your account.

If you receive a "2FA code error" message after you input your Google Authentication code, please try the solutions below:
Synchronize the time on your mobile phone (to synchronize your Google Authenticator app) and your computer (from which you attempt to log in).
Go to the Binance Login page with the incognito mode on Google Chrome.
Clear your browser cache and cookies.
Try to log in from the Binance App instead.
If none of the above suggestions could solve your problem, we suggest you reset your Google Authenticator.
Please follow the instructions in How to Reset Google Authentication or How to Reset Google Authentication on Binance App.
1. Tap on the [Profile] icon and tap [Security] - [Google Authentication].


 2. Tap [Change Google Authentication]. Please note that withdrawals and P2P trading from your account will be
disabled for 24 hours for security reasons.Tap [Continue] to proceed.
2. Tap [Change Google Authentication]. Please note that withdrawals and P2P trading from your account will be
disabled for 24 hours for security reasons.Tap [Continue] to proceed.

 If your Google Authenticator is working normally:
3. Verify your request with your current phone number and other 2FA devices. Tap [Submit].
 4. You will then be prompted to download the Google Authenticator App. Tap [Download] if you haven’t, or tap [->] to continue.
 5. You will see a backup key. Please save it securely. This will allow you to recover your Google Authenticator in case you lose your phone.
 6. Enter the backup key you just backed up.
 7. Now go to your Google Authenticator app. Tap on the [+] and select [Enter a setup key] to add the backup key you just saved. Tap [Add].


 8. Go back to the Binance App and use your new Google Authenticator to verify the change. Tap [Submit] to complete the process.
If your Google Authenticator is working properly, you can change or disable it by following these steps:
1. Log in to your Binance account and click[Profile] - [Security].
 2. Next to [Google Authentication], click [Change] to directly replace your existing Google Authenticator,
or click [Remove] to unbind the current Authenticator and bind a new one later.
2. Next to [Google Authentication], click [Change] to directly replace your existing Google Authenticator,
or click [Remove] to unbind the current Authenticator and bind a new one later.
 Please note that withdrawals and P2P selling will be disabled for 24 hours after you make this change.
3.1. If you clicked [Change]:Read the notes carefully and click [Confirm].
 To remove your old Google Authenticator, you need to verify this request with your 2FA devices. Then click [Remove and continue].
 Scan the QR code with your Google Authenticator app. If you are unable to scan it, enter the code manually in the app and click [Next].
 You will see a backup key. Please save it on paper. This Key will allow you to recover your Google Authenticator in case you can’t access
the app in the future.Click [Next] if you confirm to reset.
You will see a backup key. Please save it on paper. This Key will allow you to recover your Google Authenticator in case you can’t access
the app in the future.Click [Next] if you confirm to reset.
 Now verify with your email and the new Google Authenticator to complete the setup.

 3.2. If you clicked [Remove]:Read the notes carefully and click [Confirm].
 Verify your request with your 2FA devices and click [Remove].
 Your Google Authenticator is successfully removed. Click [Back to Security].
 2. Select the unavailable security device and tap [Confirm reset].
 3. Complete the 2FA verification from your other available devices and tap [Submit].
 4. Enter your new phone number and tap [Get Code] to get an SMS verification code.
Please note that your original phone number cannot be used again. Tap [Reset Now].
4. Enter your new phone number and tap [Get Code] to get an SMS verification code.
Please note that your original phone number cannot be used again. Tap [Reset Now].
 5. Follow the instructions to complete the verifications below:
Answering Security Questions:
5. Follow the instructions to complete the verifications below:
Answering Security Questions:
 ID verification:
 Facial verification:
 6. After completing the verifications, we will review it as soon as possible. Please wait patiently.
 Please note that different users will need to perform different verifications based on account status.
If you cannot receive SMS codes normally, you can choose to reset SMS Authentication by following these
steps:1. Click [Security verification unavailable]
 2. Please select the unavailable security item and click [Confirm reset] to go to the next step.
 3. Verify your request with your other available 2FA devices and click [Submit].
 4. Enter your new phone number and click [Get code]. Please note that your original phone number cannot be used again.
Click [Reset Now].The system will automatically send an SMS verification code to your new phone number. Please enter the code within 30 minutes.
4. Enter your new phone number and click [Get code]. Please note that your original phone number cannot be used again.
Click [Reset Now].The system will automatically send an SMS verification code to your new phone number. Please enter the code within 30 minutes.
 5. After clicking, follow the instructions on the page to complete the below verifications:
Answering Security Questions:
 ID verification:
 Click [Next] to start the verification process.
 Please choose the country your ID was issued in and select ID type.
 Upload the front page of your ID document.
 Upload the back page of your ID document.
 Shoot a picture of yourself with your face being clearly visible (we are not accepting screenshots or edited pictures).
 Face verification:
 You can go through the process in the PC browser or by scanning the QR code with the Binance App.
Open your Binance App and tap the [Scan] button on the upper right corner of the homepage.
You can go through the process in the PC browser or by scanning the QR code with the Binance App.
Open your Binance App and tap the [Scan] button on the upper right corner of the homepage.
 6. Once you completed the verifications, we will review your application as soon as possible.
Please wait patiently.Please note that different users will need to perform different verifications based on their account status.
6. Once you completed the verifications, we will review your application as soon as possible.
Please wait patiently.Please note that different users will need to perform different verifications based on their account status.
Our full list of supported countries for sending SMS
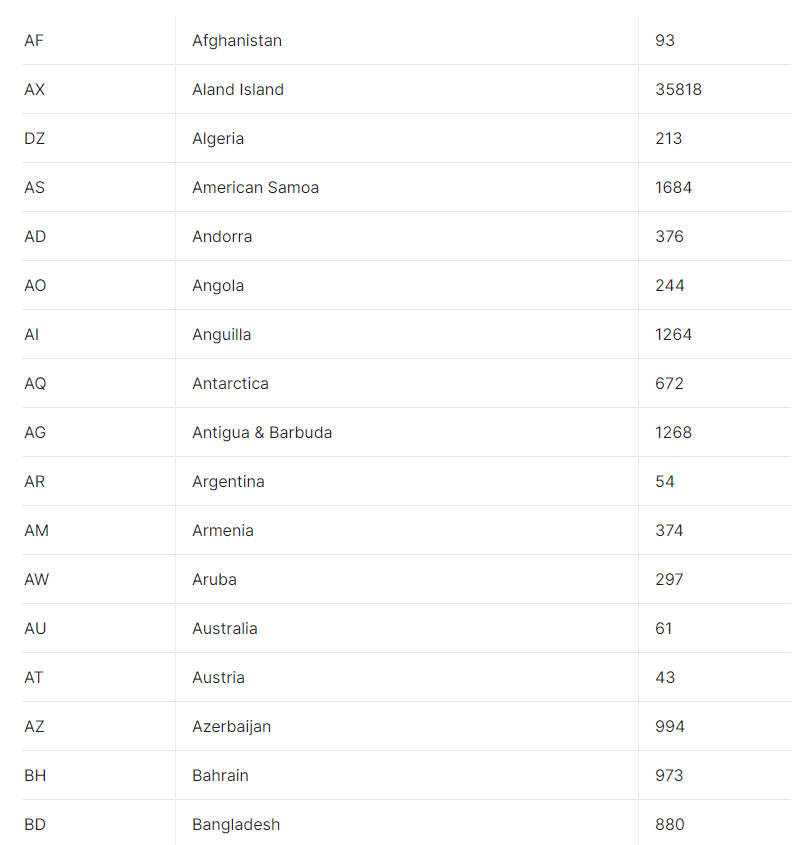
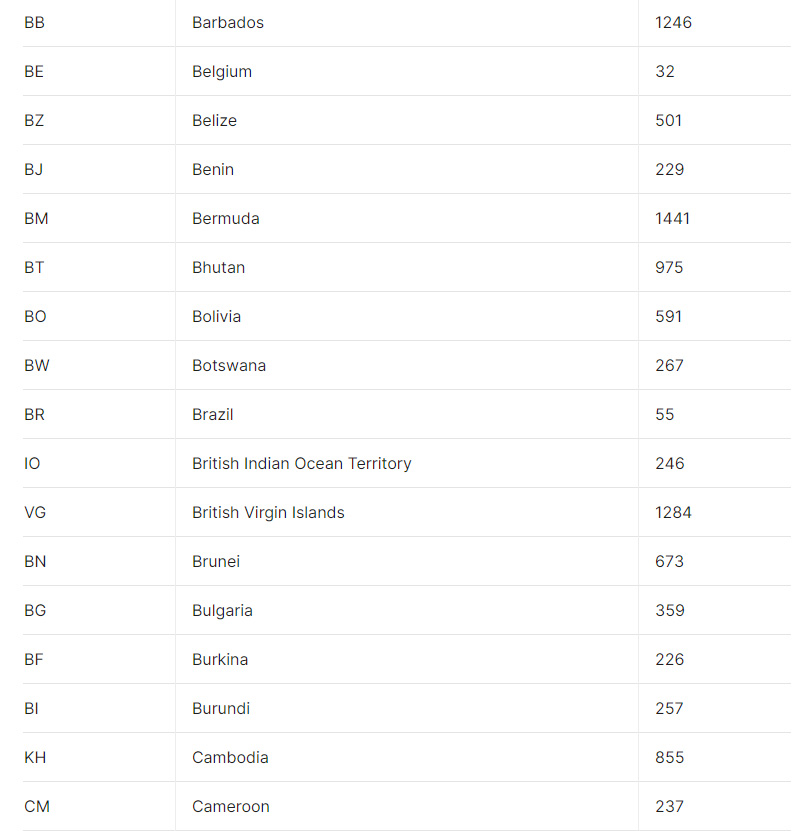
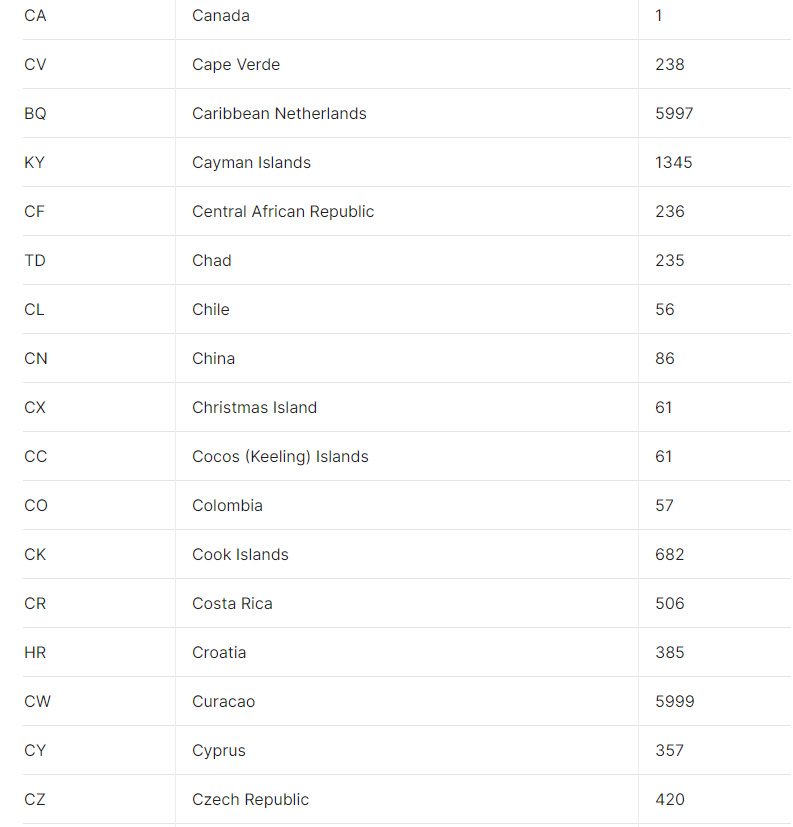
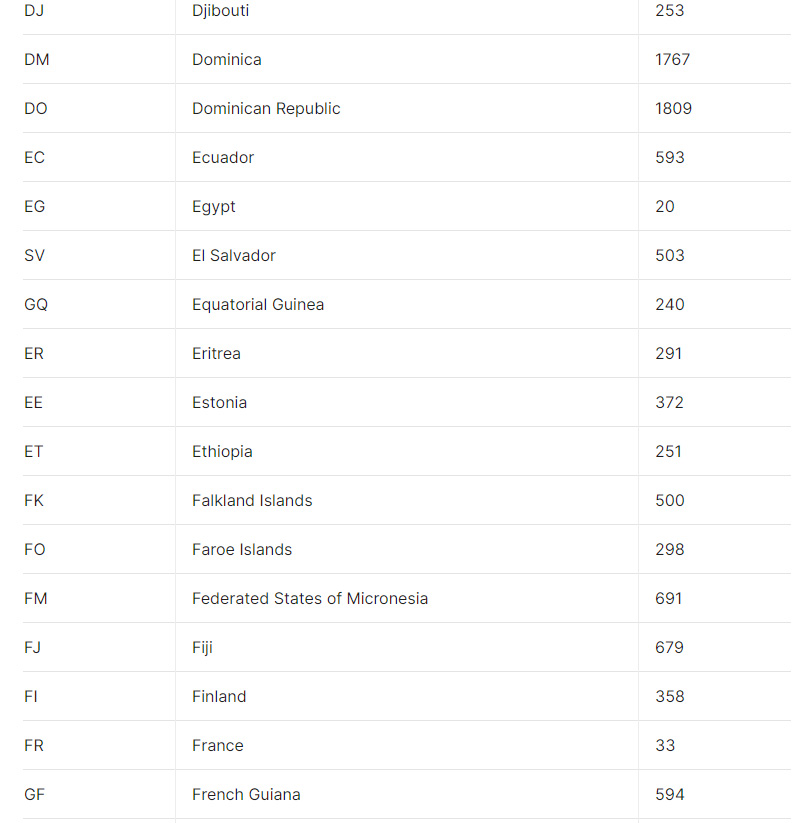
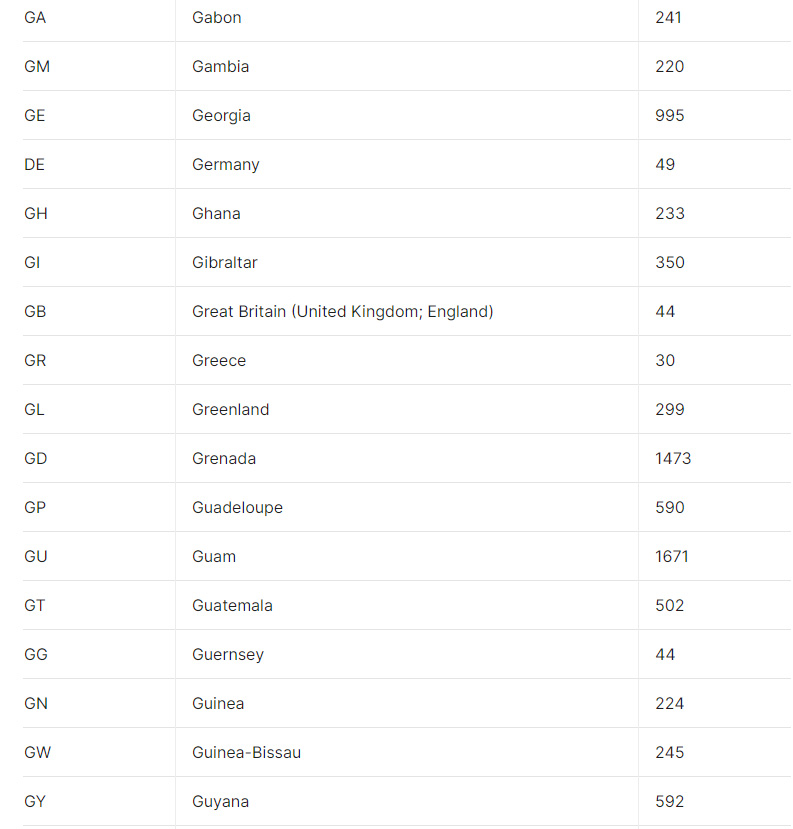
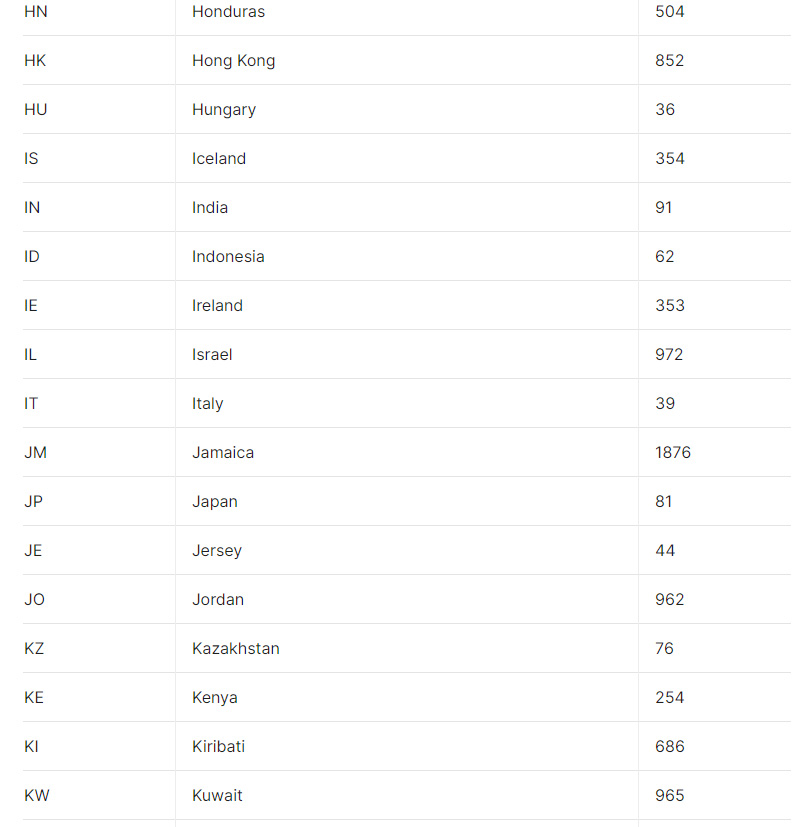

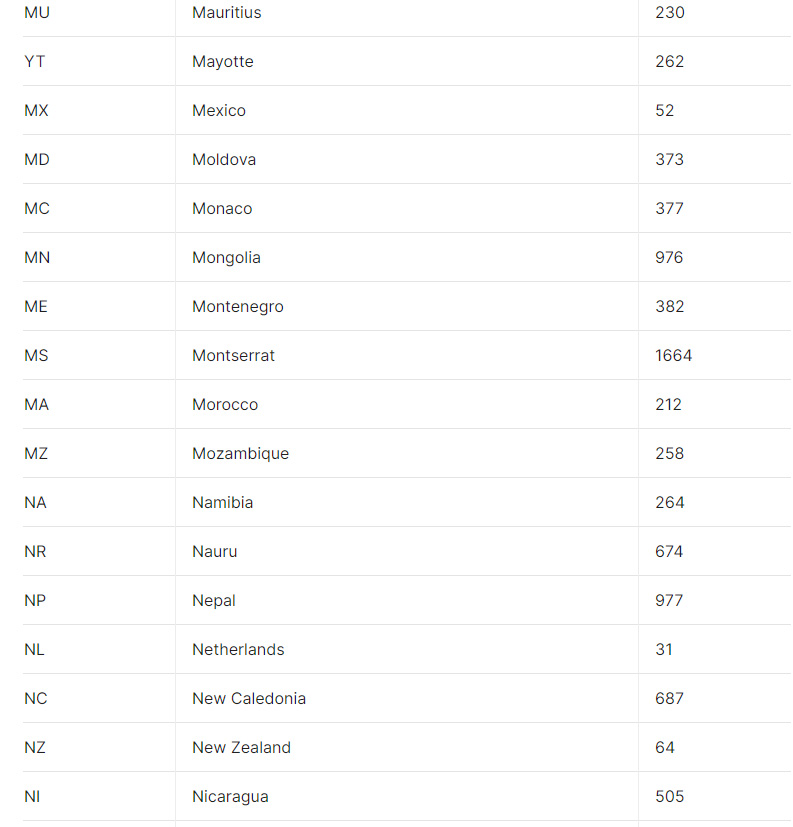
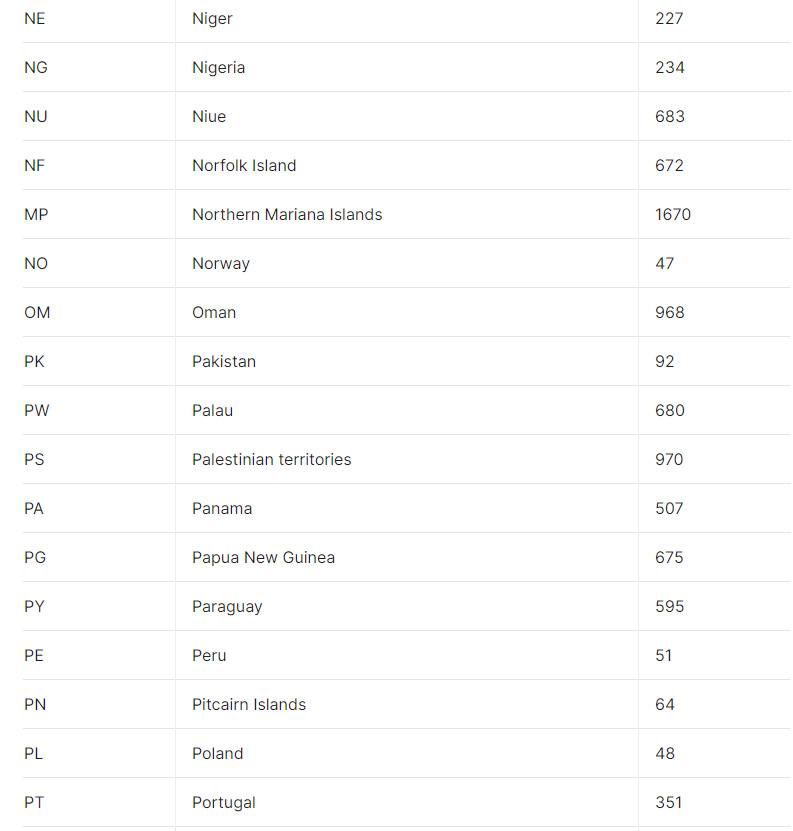
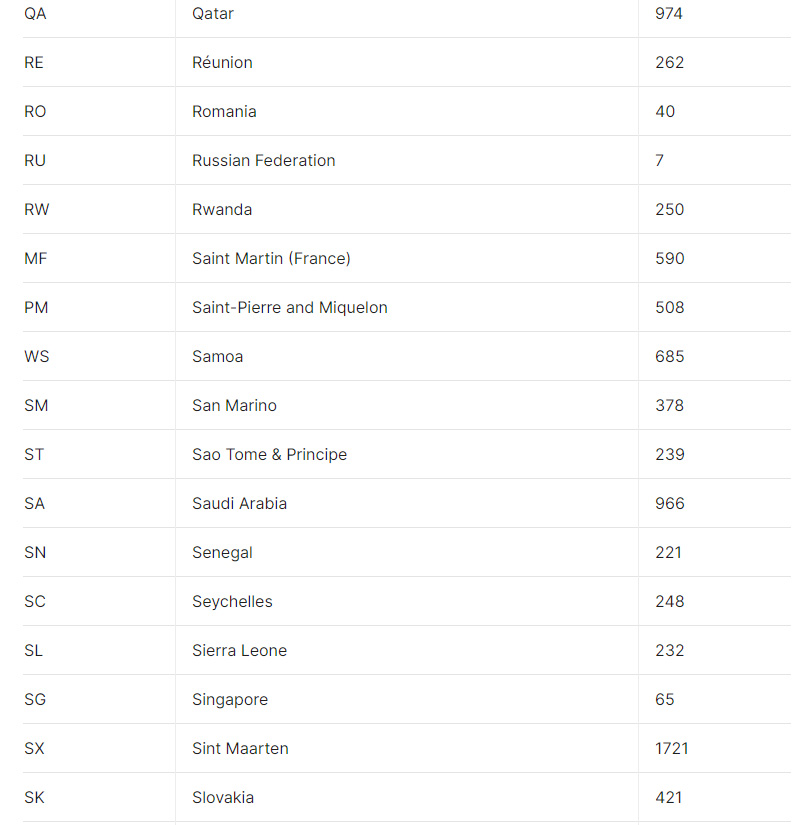

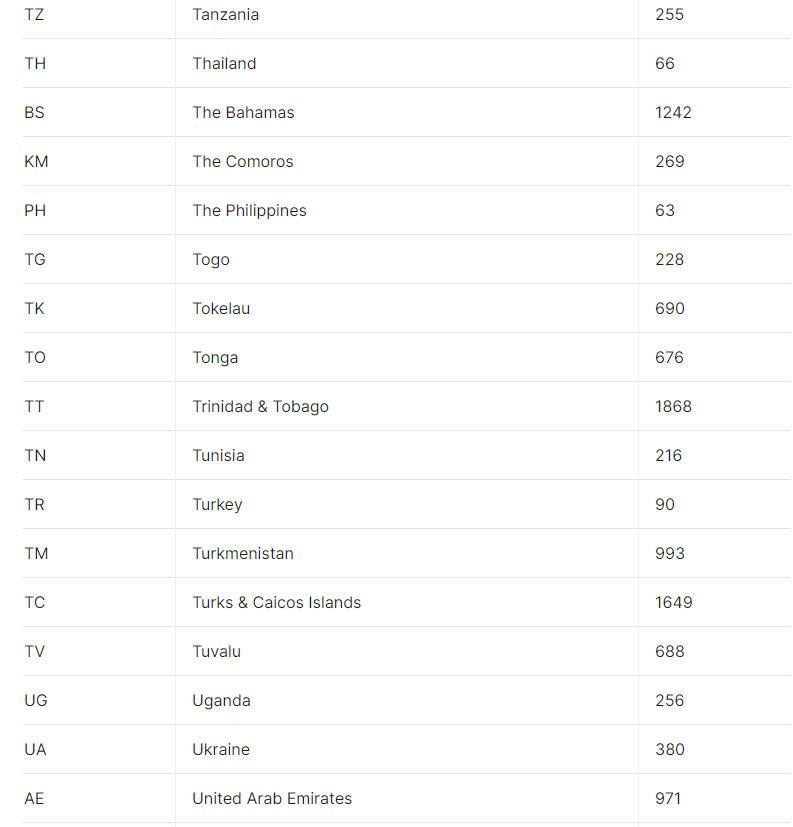
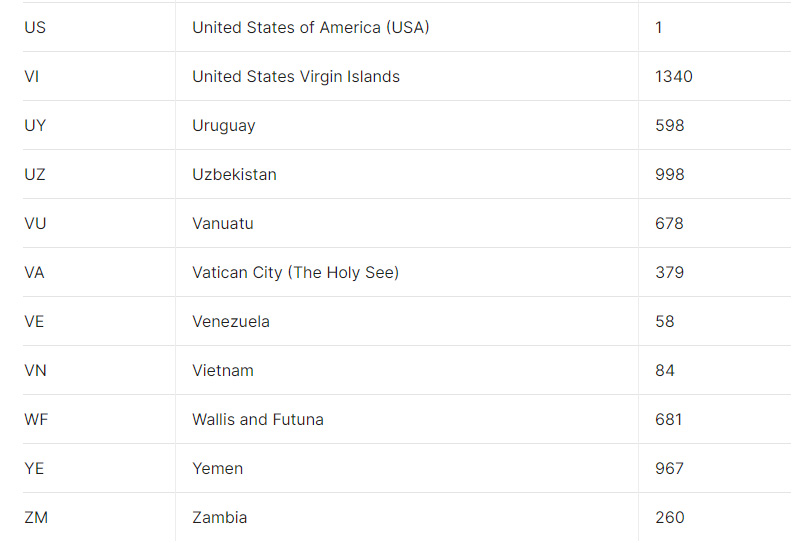
Binance continuously improves our SMS Authentication coverage to enhance user experience.
However, there are some countries and areas currently not supported.If you cannot enable SMS Authentication,
please refer to our Global SMS coverage list to check if your area is covered. If your area is not covered on the list,
please use Google Authentication as your primary two-factor authentication instead. You may refer to the following guide:
How to Enable Google Authentication (2FA) .If you have enabled SMS Authentication or you are currently residing in a country or
area that’s in our Global SMS coverage list, but you still cannot receiving SMS codes, please take the following steps:
Ensure that your mobile phone has a good network signal.
Disable your anti-virus and/or firewall and/or call blocker apps on your mobile phone that might potentially block our SMS Codes number.
Restart your mobile phone.
Try voice verification instead.
Reset SMS Authentication, please refer to here.
What is a Yubikey?
A YubiKey is a small electronic device that works as a security key and can be used for various authentication methods.
On Binance, security keys can provide an extra layer of account security, acting as a Two-factor Authentication (2FA) method for
logging in to your account, withdrawing funds, and resetting passwords. While there are other types of security keys,
this guide focuses on the YubiKey.
Note:
You can bind up to 5 Yubikeys to your account, each Yubikey has the same access right to your account;
Any bound Yubikeys can be used to verify your account.
How to set up your Yubikey on Binance?
1. Log in to your Binance account, go to [Profile] - [Security]. Next, click [Setup] to start the process.
 2. Read the note carefully and if you agree, click [Continue anyway].
 3. You will need to insert your YubiKey and activate it. Please insert your YubiKey into an available USB
port and touch its button within 60 seconds. You can try again if time is up.
3. You will need to insert your YubiKey and activate it. Please insert your YubiKey into an available USB
port and touch its button within 60 seconds. You can try again if time is up.

 Click [Allow] if you get the following message:
 4. Your Yubikey is now verified. You need to set a label (name) for your YubiKey. Then click [Verify your account].
 5. You will need to verify the Yubikey with your other 2FA verification codes.
6. Congratulations. Your account is now secured by a YubiKey.
5. You will need to verify the Yubikey with your other 2FA verification codes.
6. Congratulations. Your account is now secured by a YubiKey.
1. Enter the Account Center and click the [Security] tab in the [2FA] section.
Next, click the [Manage] button to enter the “Security Key Management” page and click [Delete] under the “Action” column.
 2. Click [I understand] after confirmation on the pop-up message.
 3. Insert your YubiKey into an available USB port on your machine and press the authentication button within 60 seconds.
You can try again if the time is up. If you have multiple Yubikeys, you can verify any of them.
3. Insert your YubiKey into an available USB port on your machine and press the authentication button within 60 seconds.
You can try again if the time is up. If you have multiple Yubikeys, you can verify any of them.
 4. Verify the deletion of your YubiKey through Google Authentication or SMS Authentication.
 5. The Yubikey has been removed from your account successfully.
Log in to your Binance account and click [Profile] - [Security]. Click [Download Binance Authenticator] to download the app on your phone.
 If you haven’t enabled any authenticators yet:
1. Click [Enable].
 2. You will be redirected to the [Enable Binance/Google Authenticator] page. Click [Binance Authenticator] and download the app if you haven’t.
 3. You will then see a QR code and a 16-digit key on the screen.Open Binance Authenticator on your phone and scan the QR code, or enter the 16-digit key manually.
 4. You should see a 6-digit code. Click [Next].
 5. Back up your new key in secure locations and click [Next].
 6. To enable Binance Authenticator for your account, verify with your 2FA devices.
 7. You have successfully enabled Binance Authenticator.

If you’ve enabled Google Authenticator before:
1. You need to remove your current Google Authenticator first, as you can only enable either Binance Authenticator or Google Authenticator for your account.
Click [Change] - [Confirm] to proceed.Please note in order to protect your account,
withdrawals and P2P selling will be disabled for 24 hours after you change your Authenticator.

2. You will be redirected to the [Change Binance/Google Authenticator] page. Complete 2FA verification with your 2FA devices, including your current Google Authenticator.

3. You will see a QR code and a 16-digit key on the screen.

Open Binance Authenticator and scan the QR code, or enter the 16-digit key manually.

4. You should see a 6-digit code. Click [Next].

5. Back up your new key in secure locations and click [Next].

6. To enable Binance Authenticator for your account, verify with your 2FA devices, including the code from your newly-enabled Binance Authenticator.

7. You have now enabled Binance Authenticator.

If you wish to change the email registered to your Binance account, please follow the step-by-step guide below.
After logging in to your Binance account, click [Profile] - [Security].
 Click [Change] next to [Email Address]. You can also access it directly from here.
 To change your registered email address, you must have enabled Google Authentication and SMS Authentication (2FA).
Please note that after changing your email address, withdrawals from your account will be disabled for
48 hours for security reasons.If you wish to proceed, click [Next].
To change your registered email address, you must have enabled Google Authentication and SMS Authentication (2FA).
Please note that after changing your email address, withdrawals from your account will be disabled for
48 hours for security reasons.If you wish to proceed, click [Next].
 If you can access your original email:
1. You need to verify your original email address. Click [Click to get code] and enter the code sent to your email.
 2. Enter your new email address and password. Please note that the new email address should not be registered to any Binance accounts.
 3. You need to verify your new email. Click [Click to get code] and enter the code sent to your new email.You will also need to verify this action by 2FA verification.
 4. Your email is successfully changed. Please sign in with the new email address.

If you are not receiving emails sent from Binance, please follow the instructions below to check your email’s settings:
1. Are you logged in to the email address registered to your Binance account? Sometimes you might be
logged out of your email on your devices and hence can’t see Binance’s emails. Please log in and refresh.
2. Have you checked the spam folder of your email? If you find that your email service provider is pushing Binance
emails into your spam folder, you can mark them as “safe” by whitelisting Binance’s email addresses.
You can refer to How to Whitelist Binance Emails to set it up.Addresses to whitelist:
• [email protected]
• [email protected]
• [email protected]
• [email protected]
• [email protected]
• [email protected]
• [email protected]
• [email protected]
• [email protected]
• [email protected]
• [email protected]
• [email protected]
• [email protected]
• [email protected]
• [email protected]
3. Is your email client or service provider working normally?
You can check the email server settings to confirm that there isn’t any
security conflict caused by your firewall or antivirus software.
4. Is your email inbox full? If you have reached the limit, you won't be able to send or receive emails. You can delete some of the old emails to free up some space for more emails.
5. If possible, register from common email domains, such as Gmail, Outlook, etc.
If you find that your email service provider is pushing Binance emails into your spam folder,
you can follow the below instructions to whitelist Binance’s email addresses.
Outlook
1. Log in to your Outlook email and go to [Settings] - [View all Outlook settings].
 2. Click [Email] - [Junk email]. You will see [Safe senders and domains].
 3. Click [Add] to add the official Binance email addresses into the list.
This can ensure that Outlook doesn’t move Binance emails to your Junk folder.
Click [Save] to save your settings.Addresses to whitelist:
3. Click [Add] to add the official Binance email addresses into the list.
This can ensure that Outlook doesn’t move Binance emails to your Junk folder.
Click [Save] to save your settings.Addresses to whitelist:
• [email protected]
• [email protected]
• [email protected]
• [email protected]
• [email protected]
• [email protected]
• [email protected]
• [email protected]
• [email protected]
• [email protected]
• [email protected]
• [email protected]
• [email protected]
• [email protected]
• [email protected]
 Gmail
Gmail
1. Log in to your Gmail account and go to [Settings] - [See all settings].
 2. Go to [Filters and Blocked Addresses] tab. Click [Create a new filter].
 3. Copy and paste the official Binance email addresses to the [From] field and click [Create filter].Addresses to whitelist:
• [email protected]
• [email protected]
• [email protected]
• [email protected]
• [email protected]
• [email protected]
• [email protected]
• [email protected]
• [email protected]
• [email protected]
• [email protected]
• [email protected]
• [email protected]
• [email protected]
• [email protected]
 4. Check the box next to [Never send it to Spam] and click [Create filter].

1. Click on your Account icon and select [Reward Center] from the drop-down menu or in your dashboard after logging in to your account.
Alternatively, you can directly visit https://www.binance.com/en/my/coupon or
access the Reward Center via the “Account” or “More” menu on your Binance App.
 2. Once you receive your Futures Bonus Voucher or Cash Voucher, you’ll be able to see its face value,
expiry date, and applied products in the Reward Center.
2. Once you receive your Futures Bonus Voucher or Cash Voucher, you’ll be able to see its face value,
expiry date, and applied products in the Reward Center.
 3. If you haven’t opened a corresponding account yet, a pop-up will guide you to open it when you click the redeem button.
If you already have a corresponding account, a pop-up will come up to confirm the voucher redemption process.
Once successfully redeemed, you can jump to your corresponding account to check the balance as you click on the confirm button.
3. If you haven’t opened a corresponding account yet, a pop-up will guide you to open it when you click the redeem button.
If you already have a corresponding account, a pop-up will come up to confirm the voucher redemption process.
Once successfully redeemed, you can jump to your corresponding account to check the balance as you click on the confirm button.

 4. You have now successfully redeemed the voucher. The reward will be directly credited to your corresponding wallet.

What is Savings Trial Fund?
Savings Trial Fund can be used for subscribing to Binance Earn Flexible Savings products.
You cannot withdraw or exchange your Savings Trial Fund, but you can enjoy the annualized
interest generated by the subscribed Savings product with the sponsored capital.
How to redeem a Savings Trial Fund?
 Alternatively, you may access the Reward Center from [Account] or the [More] menu on your Binance App.
 2. Once you receive your Savings Trial Fund, you’ll be able to see its face value, expiry date, and
activation period in the Reward Center.Please note that you can only redeem your Savings Trial Fund on
the Binance website, and can only apply the vouchers to Flexible Savings products.
2. Once you receive your Savings Trial Fund, you’ll be able to see its face value, expiry date, and
activation period in the Reward Center.Please note that you can only redeem your Savings Trial Fund on
the Binance website, and can only apply the vouchers to Flexible Savings products.
 3. Click on the voucher you want to use and you will see the instructions. Click [Go to the Savings page]
 4. You will be redirected to Savings and see a pop-up window. Click the [Use Savings Trial Fund] and choose the coupon you want to use.
Read and agree to the Service Agreement and click [Confirm].Please note that Trial Fund is not eligible for withdrawal or exchange,
and it can be used only to redeem the annual yield from the Savings product you subscribed.
4. You will be redirected to Savings and see a pop-up window. Click the [Use Savings Trial Fund] and choose the coupon you want to use.
Read and agree to the Service Agreement and click [Confirm].Please note that Trial Fund is not eligible for withdrawal or exchange,
and it can be used only to redeem the annual yield from the Savings product you subscribed.
 5. To view your subscription history, go to [Orders] - [Earn History] - [Savings] - [Savings Trial Fund], or via [Wallet] - [Earn] - [Savings Trial Fund]
1. Click on your Account icon and select [Reward Center] from the drop-down menu or in your dashboard after logging in to your account.
Alternatively, you can directly visit https://www.binance.com/en/my/coupon or access the Reward Center via the
“Account” or “More” menu on your Binance App.
 2. Once you receive your VIP Upgrade Voucher, you’ll be able to see its upgrade level, expiry date,
and reward time in the Reward Center. Currently, you can redeem your
VIP Upgrade Voucher on the Binance App or webpage.
2. Once you receive your VIP Upgrade Voucher, you’ll be able to see its upgrade level, expiry date,
and reward time in the Reward Center. Currently, you can redeem your
VIP Upgrade Voucher on the Binance App or webpage.
 3. A pop-up will show you the upgrade VIP level and its duration. Once your voucher is redeemed and activated,
you will upgrade your VIP level and enjoy the benefits during the reward time. You will also be able to see your
new VIP level in the Account-Dashboard and Fee Schedule page.
3. A pop-up will show you the upgrade VIP level and its duration. Once your voucher is redeemed and activated,
you will upgrade your VIP level and enjoy the benefits during the reward time. You will also be able to see your
new VIP level in the Account-Dashboard and Fee Schedule page.
 4. Please note that VIP9 is the highest level you can reach.
• If you’ve already reached that level, you won’t be able to redeem your voucher.
• Your upgrade will always be limited to VIP9 (e.g. VIP8 + VIP+2 voucher = VIP9).
• You can only activate one VIP Upgrade Voucher at a time. If your VIP upgrade is already active,
you won’t be able to redeem your voucher during the same period.
• Once successfully redeemed, the cashback reward will be activated. Following the activation,
the corresponding cashback in the amount equal to the trading fee of the certain product each day
will be distributed to the user’s spot account in USDT the following day of the user’s trading before UTC23:59:59.
The first cashback will consist of only the trading fee generated after the redemption of this voucher
until UTC23:59:59 of that day;
• The maximum cashback amount of one user equals the face value of the cashback voucher, which will be deducted each day
according to the cashback distribution until depletion or the expiry of the cashback reward time. The trading fee of the
eligible orders will be converted into USDT according to the real-time exchange rate of the corresponding orders, summed up and
distributed to the spot accounts of users. Users acknowledge and agree that Binance shall not be liable for any loss in connection
with the exchange rate applied. Users may visit Wallet - Transaction History - Distribution or click “Detail” on the voucher for more
information on the cashback distribution history each day;
• The cashback amount distributed each day equals the total amount of trading fees users actually paid the previous day, reflecting the
application of the VIP discount and BNB discount; the liquidation fee and the delivery fee of the Futures are excluded from the cashback program.
If the total amount of trading fees users actually paid the previous day is less than 0.00000001 USDT, it would be deemed ineligible for the purpose of
the cashback voucher; If the total amount of the corresponding trading fee of the eligible orders is greater than the remaining balance of the cashback voucher,
users will only receive cashback reflecting that remaining balance of the cashback voucher.
E.g. User A activated a Spot Cashback Voucher with a face value of 500 USDT and a remaining balance of 100 USDT. Should User A accumulate another 300 USDT as the
trading fee for Spot trading today, he will only receive the remaining balance of 100 USDT as the cashback.
• If a user activates multiple Cashback Vouchers that applied to the same product at the same time,
the vouchers will be deducted according to the order of redemption (first redemption, first burn).
E.g. User A activated a 500 USDT Perpetual Futures Cashback Voucher (Voucher A), then activated another 1000 USDT Perpetual Futures Cashback Voucher (Voucher B).
If User A pays 300 USDT in total as the trading fee for Perpetual Futures trading today, then the remaining cashback balance for these vouchers after the distribution will be:
Voucher A-200 USDT, Voucher B-1000 USDT; if User A pays 800 USDT in total as the trading fee for Perpetual Futures trading today, then the remaining cashback balance for these
vouchers after the distribution will be: Voucher A-0 USDT, Voucher B-700 USDT;
• The cashback reward expires after a certain period. Users may refer to the “instruction” on the cashback voucher for information on the cashback reward time.
Users will not be able to apply or use the remaining balance of the cashback vouchers in any way once the
cashback reward time has expired;
• Binance reserves the right to of final interpretation of the Terms and Conditions
Risk warning: Futures trading is a highly risky endeavor, with the potential for both great profits and significant losses.
Please be aware that in the event of extreme price movement, there is a chance that all margin balance in your futures wallet may be liquidated.
You acknowledge and agree that you shall assume all risks related to any and all of your trading activities and that Binance shall not be liable for
any such risks or adverse outcomes.
1. Click on your Account icon and select [Reward Center] from the drop-down menu or in your dashboard after logging in to your account.
Alternatively, you can directly visit https://www.binance.com/en/my/coupon or access the
Reward Center via the “Account” or “More” menu on your Binance App.
 2. Once you received your Cashback Voucher, you will be able to see its Cashback Limit (the face value of the Cashback Voucher),
Cashback Reward Time and Expiry Date of the Redemption of the Cashback Voucher, Eligibility, and
Accumulated Cashback Amount in the Reward Center.
2. Once you received your Cashback Voucher, you will be able to see its Cashback Limit (the face value of the Cashback Voucher),
Cashback Reward Time and Expiry Date of the Redemption of the Cashback Voucher, Eligibility, and
Accumulated Cashback Amount in the Reward Center.
 3. If you haven’t opened a corresponding account (e.g. the futures account), a pop-up window will guide you to open the account when you click the redeem button.
If you already have a corresponding account, a pop-up window will confirm the status of the voucher redemption.
Once successfully redeemed, your cashback reward will be activated. The corresponding cashback in the amount equal to the trading fee of
the certain product each day will be distributed to your spot account in USDT the following day of your trading. Your first cashback will consist of
only the trading fee generated after your redemption of this voucher until the end of that day. For more details about the
[Terms and Condition of the Cashback Voucher], please visit Cashback Voucher Terms and Conditions.
3. If you haven’t opened a corresponding account (e.g. the futures account), a pop-up window will guide you to open the account when you click the redeem button.
If you already have a corresponding account, a pop-up window will confirm the status of the voucher redemption.
Once successfully redeemed, your cashback reward will be activated. The corresponding cashback in the amount equal to the trading fee of
the certain product each day will be distributed to your spot account in USDT the following day of your trading. Your first cashback will consist of
only the trading fee generated after your redemption of this voucher until the end of that day. For more details about the
[Terms and Condition of the Cashback Voucher], please visit Cashback Voucher Terms and Conditions.
 4. The value of the cashback voucher will be deducted each day according to the cashback distribution, until depletion or the expiry of the cashback reward time.
You may check the accumulated cashback amount of this particular voucher in the instruction at the bottom of the cashback voucher.
Users may visit Wallet - Transaction History - Distribution or click “Detail” on the voucher for more information on the cashback
distribution history each day.
4. The value of the cashback voucher will be deducted each day according to the cashback distribution, until depletion or the expiry of the cashback reward time.
You may check the accumulated cashback amount of this particular voucher in the instruction at the bottom of the cashback voucher.
Users may visit Wallet - Transaction History - Distribution or click “Detail” on the voucher for more information on the cashback
distribution history each day.
 5. Please Note: if you activate multiple Cashback Vouchers at the same time, the vouchers will be deducted according to the order of redemption (first redemption, first burn).
In addition to the expiry date of the redemption of the cashback voucher, you will also be subject to the cashback reward time,
where you will not be able to apply or use the remaining balance of the cashback vouchers in any way once it has expired.
So hurry to your new trades!
5. Please Note: if you activate multiple Cashback Vouchers at the same time, the vouchers will be deducted according to the order of redemption (first redemption, first burn).
In addition to the expiry date of the redemption of the cashback voucher, you will also be subject to the cashback reward time,
where you will not be able to apply or use the remaining balance of the cashback vouchers in any way once it has expired.
So hurry to your new trades!
1. Click on your Account icon and select [Reward Center] from the drop-down menu or in your dashboard after logging in to your account.
Alternatively, you can directly visit https://www.binance.com/en/my/coupon or access the Reward Center via the “Account” or “More”
menu on your Binance App.
 2. Once you receive your Margin 0% Interest Voucher, you will be able to see its Interest-free loan limit(the face value),
Currency, Eligibility, Interest-free Reward Time and Expiry Date of the redemption of the voucher in the Reward Center.
2. Once you receive your Margin 0% Interest Voucher, you will be able to see its Interest-free loan limit(the face value),
Currency, Eligibility, Interest-free Reward Time and Expiry Date of the redemption of the voucher in the Reward Center.
 3. If you haven’t opened a Margin account, according to your choice of the voucher, a Cross Margin or Isolated Margin account will be automatically opened for
you once you redeem the voucher. Once the Margin accounts are open, you can activate and enjoy the interest-free privilege of your Margin loan of the respective
currency/pair within the reward time, and the interest-free loan amount of yours cannot exceed the face value of your voucher.
3. If you haven’t opened a Margin account, according to your choice of the voucher, a Cross Margin or Isolated Margin account will be automatically opened for
you once you redeem the voucher. Once the Margin accounts are open, you can activate and enjoy the interest-free privilege of your Margin loan of the respective
currency/pair within the reward time, and the interest-free loan amount of yours cannot exceed the face value of your voucher.
 4. Due to the speciality of the Isolated Margin, once a 0% Interest Voucher of the Isolated Margin is redeemed,
first you need to choose a currency pair containing the very currency of the voucher to allocate the interest-free privilege,
thus to enjoy the privilege when you borrow the exact currency under this exact pair.
4. Due to the speciality of the Isolated Margin, once a 0% Interest Voucher of the Isolated Margin is redeemed,
first you need to choose a currency pair containing the very currency of the voucher to allocate the interest-free privilege,
thus to enjoy the privilege when you borrow the exact currency under this exact pair.
 5. There will be a sign adjacent to the name of Cross Margin & Isolated Margin in Wallet - Margin once you have a non-claimed 0% interest privilege;
Alternatively you can check how many more amount of 0% interest privilege you can enjoy from the window of Wallet - Margin - Borrow/Repay,
and you can jump to the Reward Center from here directly to activate them.
5. There will be a sign adjacent to the name of Cross Margin & Isolated Margin in Wallet - Margin once you have a non-claimed 0% interest privilege;
Alternatively you can check how many more amount of 0% interest privilege you can enjoy from the window of Wallet - Margin - Borrow/Repay,
and you can jump to the Reward Center from here directly to activate them.
1. Click on your Account icon and select [Reward Center] from the drop-down menu or in your dashboard after logging in to your account.
Alternatively, you can directly visit https://www.binance.com/en/my/coupon or access the Reward Center via the “Account” or “More”
menu on your Binance App.
 2. Once you receive your voucher code, you can redeem the code via the “Voucher Code” window in the Reward Center.
You can also check the latest 5 records in the redemption history within the same window.
2. Once you receive your voucher code, you can redeem the code via the “Voucher Code” window in the Reward Center.
You can also check the latest 5 records in the redemption history within the same window.

 3. Once a voucher code is successfully redeemed, you can check and use the corresponding voucher(s) in the Reward Center.
Please note that one voucher code can only be redeemed once, and a voucher code cannot be redeemed once expired(promotion ended).
If you didn't meet the redeem criteria of this code, there will be alerts to tell you to check the promotion rules further.
3. Once a voucher code is successfully redeemed, you can check and use the corresponding voucher(s) in the Reward Center.
Please note that one voucher code can only be redeemed once, and a voucher code cannot be redeemed once expired(promotion ended).
If you didn't meet the redeem criteria of this code, there will be alerts to tell you to check the promotion rules further.


You can check all your Binance wallet balances and transfer funds between your wallets from the [Wallet Overview] page.
How to check my Binance wallet balances?
1. Log in to your Binance account and go to [Wallet] - [Overview].
2. Here you can check the balances of all your Binance wallets, and make transfers internally or externally.
You can see the [Estimated Balance] of your wallets. This is an approximate value of your balance in BTC, along with an estimated value in the fiat currency of your choice (in USD by default).
To show or hide your wallet balance, click [Show Balance]
 To access different wallets, click on the corresponding wallet name on the left or at the bottom.
3. Apart from the Binance wallets, you can also add your Binance TR, Tokocrypto, JEX, WazirX, and BPLAY accounts.

 How to make a transfer between my Binance wallets?
If you want to trade on a specific market, you need to transfer your funds to the corresponding wallets before you can trade.
For example, if you bought crypto via P2P and want to do spot trading, you need to transfer the assets to your Fiat and Spot Wallet first.
1. To make a transfer between your wallets, click [Transfer]
 2. Select the wallets you want to make the transfer and the coin, and enter the amount.
Click [Confirm].For more details on internal transfer between wallets, please refer to the [Transfer] pop-up window.
2. Select the wallets you want to make the transfer and the coin, and enter the amount.
Click [Confirm].For more details on internal transfer between wallets, please refer to the [Transfer] pop-up window.

What is Wallet Direct?
Wallet Direct allows seamless token transfer between connected Binance account and Binance Extension Wallet (BEW).
Once you establish the connection, you won’t have to copy/paste the address and memo every time you make a transfer.
How to connect my Binance Wallet and Binance Extension Wallet (BEW) via Wallet Direct?
To connect your wallets via Wallet Direct, you need to:
• Enable two-factor authentication (2FA) for your Binance account;
• Install the latest version of Binance Extension Wallet on Chrome or Firefox (v1.126.11 or above);
• Log in to your Binance Extension Wallet on your browser.
Once you complete the above, follow the instructions below to connect your wallets:1. Log in to your Binance account and go to [Wallet Direct].
Click [Verify and connect my address], then read the Wallet Direct Notice and click [I understand].

 2. You need to verify address ownership. Connect your browser extension wallet by clicking [Connect to wallet].
 3. You will see a pop-up window with a connecting request. Click [Connect].
 4. You see a “sign message”. Click [Sign with wallet] and [Confirm] to verify that you are the owner/creator of the address.
 5. You should see your Binance Extension Wallet address. Click [Bind] and verify the request with your 2FA devices.
 6. You have successfully connected the wallets.
 7. You can also check the connection status from Binance Extension Wallet under [Account].
You will see “Binance Account” and your Binance email address if the wallets are successfully connected.
7. You can also check the connection status from Binance Extension Wallet under [Account].
You will see “Binance Account” and your Binance email address if the wallets are successfully connected.
 How to disconnect my wallets?
Go to [Wallet Direct] and click [Disconnect] next to the Binance Extension Wallet you want to disconnect.
 Click [Disconnect] to confirm.
 Alternatively, you may disconnect your wallets from Binance Extension Wallet.Go to [Account] - [Manage].
Click [Disconnect] under the account you want to disconnect.
Alternatively, you may disconnect your wallets from Binance Extension Wallet.Go to [Account] - [Manage].
Click [Disconnect] under the account you want to disconnect.
 Click [Disconnect] to confirm.

Binance is gradually migrating P2P and other wallets to Funding Wallets on the Binance App to enhance user experience.
If you have a P2P, Pay, Card, or Gift Card Wallet, your funds will be migrated to your Funding Wallet, too
 The wallet balance shown on your Funding Wallet includes the total balance of crypto from your P2P buy/sell orders,
Binance Pay, Binance Card, and Binance Gift Card.
The wallet balance shown on your Funding Wallet includes the total balance of crypto from your P2P buy/sell orders,
Binance Pay, Binance Card, and Binance Gift Card.
 Please note that all the funds in your Funding Wallet are transferable.
For example, your Funding Wallet balance has 1,000 USDT and you purchased 100 USDT from P2P trading,
your transferable amount will be 1,100 USDT.
Please note that all the funds in your Funding Wallet are transferable.
For example, your Funding Wallet balance has 1,000 USDT and you purchased 100 USDT from P2P trading,
your transferable amount will be 1,100 USDT.
Frequently Asked Questions (FAQ)
1. Where can I find the crypto purchased from P2P trading?
The crypto you purchased from P2P trading will be transferred to your [Funding Wallet].
To trade with those cryptos, you need to manually transfer them to the relevant wallets,
such as the [Spot Wallet], [Margin Wallet], or [Futures Wallet].
2. I want to sell my crypto via P2P trading. Which Wallet should I use?
To sell your crypto via P2P trading, you need to transfer your funds to [Funding Wallet] first.
The sell orders will be deducted from your Funding Wallet directly.
3. Will my Wallet balance change after the migration?
No, your funds will be safe. The Binance Tech Team will help you transfer all your P2P, Pay, Card, and
Gift Card Wallet balance to your [Funding Wallet] during the migration, you don’t need to operate anything.
Related Articles
How to Check Balance and Transfer Funds on Wallet OverviewHow to Connect Binance Extension Wallet (BEW) via Wallet DirectFrequently Asked Questions on
P2P Wallet to Funding Wallet MigrationHow to Connect to Tokocrypto Wallet on Binance.com
Binance is gradually migrating P2P Wallets to Funding Wallets to enhance user experience.
If you have a P2P Wallet, your funds will be migrated to your Funding Wallet.
For more details, please refer to the migration schedule on our announcement.
Please note that the wallet balance shown on your Funding Wallet includes the total
balance of crypto from your P2P buy/sell orders, Binance Pay, and Binance Card, etc.
 After the migration:
• You can no longer see your P2P Wallet on [Wallet Overview]
After the migration:
• You can no longer see your P2P Wallet on [Wallet Overview]
• You will see a pop-up message regarding your P2P Wallet to Funding Wallet migration
• The balance shown on your Funding Wallet includes the total balance of crypto from your P2P buy/sell orders, Binance Pay, and Binance Card, etc.
 Please note that as we are migrating users’ wallets gradually, some users might still be able to access their P2P Wallets. New users will only have access to Funding Wallet, not P2P Wallet.
 Frequently Asked Questions
1. Where can I find the crypto purchased from P2P trading?
The crypto you purchased from P2P trading will be transferred to your Funding Wallet.
To trade with those cryptos, you need to manually transfer them to the relevant wallets,
such as the [Fiat and Spot Wallet], [Margin Wallet], or [Futures Wallet].
2. I want to sell my crypto via P2P trading. Which Wallet should I use?
To sell your crypto via P2P trading, you need to transfer your funds to Funding Wallet first.
The sell orders will be deducted from your Funding Wallet directly.
3. Will my Wallet balance change after the migration?
No, your funds will be safe. The Binance Tech Team will help you transfer all your P2P Wallet balance to
your Funding Wallet during the migration, you don’t need to operate anything.
4. How to check my P2P Wallet transfer history?
You can check your P2P Wallet transfer history from [Transaction History].
Please note that as your P2P Wallet has been migrated, you can only check the transfer history before the migration.
Binance tasks are challenges and criteria that a user can meet to gain some kind of reward.
Examples of tasks include making a combined total amount of trades in a certain cryptocurrency,
referring a friend, or taking part in some other promotional offer.
Getting a task
1. Log into your Binance account and click on your profile icon on the upper right corner.
You will see the Task Center in the drop-down menu.
 You can also enter the task center in the Binance app by clicking the profile icon and then [Task Center].

 Note: Direct link to the task center: https://www.binance.com/en/my/task/list
2. Binance issues tasks to users via the Task Center daily or weekly. The tasks will be sent to specific users based on
ongoing activities requirements. When you receive a task, you will also automatically receive an "App Push", "Inmail" or "Email" reminder,
such as "You've received a new task". The push will redirect you to the task center to see the related task.
The Task Center home page will show you recent tasks that you’ve been assigned

Binance tasks are challenges and criteria that a user can meet to gain some kind of reward.
Examples of tasks include making a combined total amount of trades in a certain cryptocurrency,
referring a friend, or taking part in some other promotional offer.
Once you are eligible for a reward, you must mark the task as complete in the Task Center.
You can find the Task Center by hovering over the profile icon on the top right hand side of the Binance homepage

Completing your task and claiming your reward
1. Please check the task rules to make sure you have satisfied their requirements.
Click the "Complete" button to jump to the corresponding page to complete the task.

2. Pay attention to two important time-sensitive countdowns: "Remaining Time" and "Expiry Date".
• "Remaining Time" refers to the time you have to complete the task.
• "Expiry Date" refers to the time you have to redeem your reward after completing the task. This is viewable in the Reward Center which will be covered later on.
Note that you won't be able to complete your task once you exceed the remaining time left.
Also, make sure to click the “Get Reward" button within the specified time after completing the task,
otherwise the reward is forfeited

3. After receiving a task, click the [Rules] button next to the task description to view its specific terms and conditions for completion.

4. After completing the task, return to the Task Center to check its completion status.
A "successful" pop-up window should appear if you have successfully met the task’s criteria. Click on [Visit Reward Center] where you will be able to redeem your reward.

5. Here in the Reward Center you’ll have an overview of all the vouchers you are able to redeem.
Simply click [Redeem Now] before the expiry date to receive your reward.
For more information about vouchers, please check our FAQ

1. Why can't I see any tasks in the Task Center?
• The Task Center automatically filters activities for users based on their levels, for example, "beginner” users will possibly receive "beginner" tasks.
• Please check the [Task Center] from time to time for available tasks. The countdown would start after receiving the task, if you can complete it within the validity period, you can click [Get Reward] for rewards.
2. I have many Binance accounts, can I claim multiple tasks?
No, Task Center activities are only available to major accounts. You cannot claim repeated tasks or rewards. Rewards are limited.
Task Center restricts"bulk registration" users and prohibits users from receiving the same reward multiple times.
3. I have completed my task, but the Task Center shows that it is not completed.
• Click [View Rules] next to the task to make sure that your task is completed according to the rules.
• Task status and rewards are updated within 4 hours after completion, please check again later.
• Make sure to click [Get Reward] before the task expires.
• If you still cannot solve the problem, please contact Binance Support for assistance.
4. I completed a 100 USDT trade, but it displayed “99 USDT” instead. Why?
The quantity cumulated is converted into USDT and could be affected by market fluctuations. Therefore it might deviate from the actual order amount.
Task center conditions and terms of use
• The task only takes effect when it appears in the [Task Center]. Even after the activity announcement, if there’s no task in the [Task Center], please wait.
• After receiving the task, please check the task "title" and "rules" before completing the task.
• The task status and cumulative value will be updated within 4 hours. If the cumulative number is not updated, please wait patiently and refresh the page.
• When the task remains incomplete, please make sure that your operation is consistent with the task rules. If not, please contact us in time [Customer Service]
• After the task is completed, please return to [Task Center] and click on "get reward", then jump to [voucher center] to use voucher
• The cumulative value of completed tasks will be uniformly converted into USDT, so it will be affected by market fluctuations and there is a small deviation from the actual order
• The task center prohibits the use of all third-party plug-ins, illegal accounts, batch registration, self-deal, market manipulation, etc. If you’re found doing illegal activities, the task will be disqualified
• The final interpretation right belongs to Binance.
Create Wallet Address
1. Click Created a New Wallet in Metamask

2. Input New Password
3. Confirm Your Password

4. Input New Password
5. Confirm Your Password
6. Click I Understand
7. Click Create Password

8. Waiting a proccess

9. Click Start from scure your wallet

10. Check All Secure your wallet
11. Click Start

12. Input your Password
13. Confirm your Password

14. Input your fix Password
15. Confirm your Password after input

16. Click View tap to reveal
17. Click Continue


18. Prepare Input Secret Recovery Phrase
19. Input Secret Recovery Phrase
20. Click Complete Backup


21. Congratulations notification appears
22. Click Done

23. Choose I Agree
Installing and setting up MetaMask
MetaMask can be downloaded on Chrome and Firefox, or on iOS and Android if you’re a mobile user.
For the purposes of this tutorial, we’ll use the Firefox version,
but the instructions will be more or less the same for every platform.
Firstly, you’ll want to head over to the MetaMask Download page. From there,
select whichever platform you’re using, and follow the steps to install it on your device. Easy!
Next, follow along with the setup specified by the app. Go ahead and click Create a Wallet.
Write down the backup seed phrase somewhere secret (preferably not on an Internet-connected device).
Without this phrase, your funds can’t be recovered if your device is damaged or lost.
Confirm that you’ve written them down on the next page.
And that’s it! You should now see your wallet, ready to send and receive funds.

Configuring the wallet
You might notice straight away that we’re still dealing with an Ethereum wallet.
At best, this won’t work with BNB Smart Chain (BSC) DApps.
At worst, you could lose funds by sending them to addresses you can’t actually use.
Let’s change that. We want to access the Settings to point the wallet towards BNB Smart Chain nodes.
 On the Settings page, we want to locate the Networks menu.
 We want to click Add Network in the top-right corner to manually add the BNB Smart Chain one – it doesn’t come packaged with MetaMask.
It’s important to note that there are two networks we can use here:
the testnet or the mainnet. Below are the parameters to fill in for each.
We want to click Add Network in the top-right corner to manually add the BNB Smart Chain one – it doesn’t come packaged with MetaMask.
It’s important to note that there are two networks we can use here:
the testnet or the mainnet. Below are the parameters to fill in for each.
Mainnet (This is the one you are probably looking for)
Network Name: Smart Chain
New RPC URL: https://bsc-dataseed.binance.org/
ChainID: 56
Symbol: BNB
Block Explorer URL:https://bscscan.com
Testnet
Network Name:Smart Chain - Testnet
New RPC URL:https://data-seed-prebsc-1-s1.binance.org:8545/
ChainID:97
Symbol:BNB
Block Explorer URL:https://testnet.bscscan.com
We’re going to use the testnet in this tutorial, but you will likely want to use the mainnet.
We recommend adding both if you intend to use MetaMask to transfer BNB or BNB Smart Chain tokens.
Once you Save the Network and return to the main view, you’ll notice two things: the network has automatically
been set to the one you just entered, and the units are no longer denominated in ETH, but in BNB.

Making transactions (on the testnet)
Don’t let the Ethereum logo fool you – we’ve tuned into the BSC testnet. Next, let’s get some funds to play with. Hover over Account 1, and
click to copy your address to the clipboard. We’ll head over to the BNB Smart Chain Faucet and paste it into the form.
 Peggy coins might be of interest if you’re testing out an application that supports BEP-20 tokens.
They’re simply tokens issued on BNB Smart Chain that are “pegged” to assets on other chains (like BTC, XRP, USDT, etc.),
meaning that they trade at the same price.
Peggy coins might be of interest if you’re testing out an application that supports BEP-20 tokens.
They’re simply tokens issued on BNB Smart Chain that are “pegged” to assets on other chains (like BTC, XRP, USDT, etc.),
meaning that they trade at the same price.
Let’s stick to BNB for now. Click on the Give me BNB dropdown and select the amount you wish to receive.
You might need to wait a couple of minutes, but the funds will show up in your testnet wallet imminently.
 From here, we’ll send the funds off somewhere to demonstrate how it works. We’ve just grabbed a random address from BscScan Testnet that we’ll donate them to. Go ahead and click Send.
 We’ve gone with a transaction of 1 BNB. We’ll leave the fees untouched and hit Next. We then get one more chance to review the transaction – if everything looks good, hit Confirm.
And that’s it! You’ll get a notification informing you when your transaction settles.
We’ve gone with a transaction of 1 BNB. We’ll leave the fees untouched and hit Next. We then get one more chance to review the transaction – if everything looks good, hit Confirm.
And that’s it! You’ll get a notification informing you when your transaction settles.
Open your Metamask wallet, select the BNB Chain or BSC network, depending on how you have added it previously.
You must be on the correct network before adding the BUSD token or you will not be able to do so.
Then scroll to the bottom of the window and you will see the option to import a token, click on it to add the BUSD contract.
You will now need to tell Metamask the contract address for the BUSD token.
BUSD token contract
0xe9e7cea3dedca5984780bafc599bd69add087d56
You can check that the contract is correct on the bscscan
website: https://bscscan.com/token/0xe9e7cea3dedca5984780bafc599bd69add087d56
Now paste the above address into the Metamask window and then click on Add Custom Token.
Done, you now have the BUSD token added in Metamask and can send and receive BUSD.
If you have any questions or concerns, leave us a comment so our support team can help you.
Creating a New Wallet
The steps for creating your first Multi-Coin Wallet is very simple and
can be done in a matter of minutes. Let me guide you thru the process.
Step 1 - Launch Trust Wallet
Upon first launch of the app, you will be presented with the screen below which is the part where you can
“Create a New Wallet” or “Import” an existing one. For this guide, we will select on Create a New Wallet.
Step 2 - Accept Terms of Usage
In order to proceed, you would need to accept the Terms of Usage. Simply put a check mark at the box then press on Continue.
No turning back now.
Warning! If you agree to to the terms of usage please be aware that, losing your recovery phrases will also mean that you lose access to your wallet.
Step 3 - Save your Recovery Phrase
This is the most important part of your crypto journey. You need to take note of your recovery seed phrases.
Your recovery phrases are the keys to your crypto wallet. So make sure to keep them in a safe place.
Tap on Continue to proceed.


Note
This is a real recovery phrase for an actual multi-coin wallet.
Does it contain anything? We will never know.
Step 4 - Verify your Recovery Phrase
If you followed Step 3 and backed up your recovery phrase, this will be a breeze.
In the correct order, select the words in order to complete the verification process.
Click Continue when you are finished.


Step 5 - Wallet is Ready
After going thru the backup and verification process you will be redirected to the main wallet screen. You will see an initial list of coins that you can start funding right away. Congratulations!


Personalize Your Wallet
You can set the name of your wallet so that you can easily recognize it. This change is only a local setting on the app and can be changed at any time.
Go to the Settings menu, then tap on Wallets.


Next, tap on the i symbol beside the wallet that you want to personalize. Save it and you are done.


Note: Also on the same screen, you will see Show Recovery Phrase. You can always go back here if you want to get your recovery phrases.
3 Steps to Protect your Crypto Wallet

You are solely responsible for your Recovery Phrase. Without it, you will not be able to access your wallet. Trust Wallet does not store your Recovery Phrase and we do not collect any personal information.
It is strongly recommended to store your Recovery Phrase offline. Write it down on a piece of paper and keep it at a secure vault.
You can read more about the Best Practices for Storing Your Recovery Phrase 1.1k if you want to try other alternatives.
Step 3 - Educate Yourself
Anyone who knows your Recovery Phrase can access your wallet and have full control of your funds.
When your funds are stolen or lost, we cannot help you retrieve them.
Here are some tips to keep in mind:
• Never enter your Recovery Phrase or Private Key on any website unless you know what you are doing.
• Never share your Recovery Phrase or Private Key to anyone that you do not know.
• Trust Wallet staff will never message you directly for any promotions or giveaways.
• Trust Wallet staff will never have a reason to ask you for your recovery phrase or private key.
• Always get news and updates from official Trust Wallet social media channels and this site
Lost Recovery Phrase or Private Key
The Terms of Usage
Upon initial creation of your wallet, you will be advised of the need to backup your wallet. And before you can “Continue”, there is a Terms of Usage that you have to agree upon.
It clearly states that:
"I understand that if I lose my recovery words, I will not be able to access my wallet."
Beyond this point, you are solely responsible of taking care of your recovery phrase. Do a Backup 4.5k of your wallet Do all necessary measures to keep it secure. Do not share it with anyone.
Blackstone Academy


